The absence of shadows was the primary obstacle that prevented Filter Forge 1.0 from truly breaking the photorealism barrier. Since the very beginning of Filter Forge we knew that shadows are crucial for realism. However, this is not something done easily – the performance of our first prototypes was pretty discouraging. But we kept working on it and, lo and behold, we now have fast, accurate and perfectly seamless Ambient Occlusion in Filter Forge!

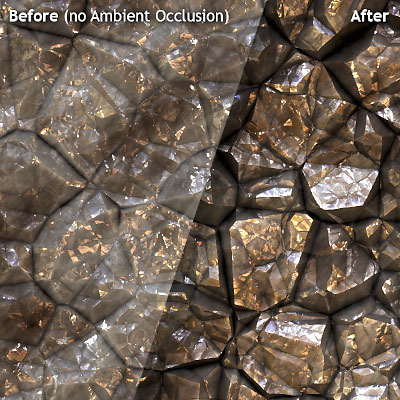
Ambient Occlusion is a shadowing technique we borrowed from the world of high-end computer graphics. In a nutshell, it calculates how much environmental light can reach a certain point of a surface, and darkens that point accordingly by filtering the incoming diffuse light – which dramatically enhances the level of realism. To demonstrate this, let's apply Ambient Occlusion to Crysta, a well-known Filter Forge filter, and see how much better it looks:
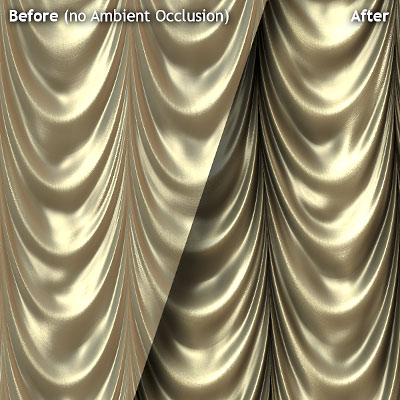
Despite being a new feature introduced in version 2.0, Ambient Occlusion works with filters created in the older version of Filter Forge. All surface-type filters created in Filter Forge 1.0 will have Ambient Occlusion settings on their Lighting tab when you open them in Filter Forge 2.0. Here's another popular Filter Forge 1.0 filter, Decadent Drapery, with Ambient Occlusion on:
Ambient Occlusion works perfectly well with all three lighting methods implemented in Filter Forge 2.0 – HDRI environment lighting, point/area lights and ambient lighting. Here's an example showing a combination of all three lighting methods used together with Ambient Occlusion:

Reflective Occlusion
In addition to Ambient Occlusion which deals with diffuse lighting, Filter Forge 2.0 can calculate Reflective Occlusion which removes excessive specular reflections from shadowed areas. It's relatively cheap to calculate, because it shares most of the calculations with Ambient Occlusion. The benefits of Reflective Occlusion are especially visible on reflective surfaces with deep dark areas:

Mathematically-Accurate Results
To ensure the correctness of Filter Forge's occlusion calculations, we constantly tested its output against analytic solutions and reference images. Here's a test rendering of an occluded sphere done in Filter Forge 2.0, compared against a reference image rendered in Mental Ray 3.7+, one of the industry's best production quality renderers. We created a 3DS Max test scene and a matching Filter Forge filter showing repeating spheres (with only one of them visible within the view), adjusted the quality settings so that both renders are of roughly the same visual quality, and rendered two 600x600 images, one in Filter Forge 2.0 and another in Mental Ray 3.7+, on a single-CPU Intel Core i7 860 machine:

Easy to Use
To apply Ambient / Reflective Occlusion to a filter, you don't have to change its internals. The only thing you need to do is to make sure that the filter in question is a Surface-type filter – that is, any filter that has the Lighting tab. To access the occlusion settings, open the Lighting tab and select the Ambience band around the environment sphere:

Fast Interactive Preview
Everyone who worked with 3D graphics knows from experience that occlusion calculations can be quite slow. This is true for Filter Forge as well. Filter Forge occlusion algorithm can be faster than that of a general 3D renderer (due to optimizations made possible by the fact that Filter Forge deals with a 2D plane with different elevation levels, not with arbitrary 3D geometry), but it still has to go through all the required calculations – there's no free lunch.
However, Filter Forge 2.0 offers something to make up for the relatively slow rendering speed of Ambient / Reflective Occlusion: it introduces a fast, interactive lighting preview that works by preserving occlusion data between rendering sessions in a memory cache. When you adjust anything on the Lighting tab (except the Occlusion Quality settings and Surface Height), the parts of the image that were rendered with Ambient / Reflective Occlusion during the previous rendering session will update almost instantly. The occlusion cache is automatically turned off for large images to conserve memory. The threshold after which the interactive preview is turned off can be specified in Tools > Options > Rendering, and it's currently set to 2 megapixels (approximately 1400 x 1400 pixels).
To see the interactive preview in action, watch this video:
Artistic Controls
For cases when the default, mathematically correct occlusion doesn't satisfy your artistic needs, Filter Forge introduces several parameters that let you adjust the tonal range of occlusion maps directly. Technically, it's a Levels adjustment applied to ambient and reflective occlusion maps after they are calculated but before they are used in the final shading. With these controls, you can deepen or lighten the shadows or even create comic book-like outlines:


Here's an example where we use the artistic controls to add thick dark comic book-like edges to our favorite example filter, Crysta:

Occlusion Maps
Similarly to normal, bump, diffuse and other maps, you can render separate Ambient Occlusion and Reflective Occlusion maps for use in your 3D projects:


