|
SpaceRay
|
||||||
| Posted: August 27, 2013 3:51 am | ||||||
|
SpaceRay
|
Good that you have been able and wanted to share and upload this filter to the library.
This is weird, unusual, curious, beautiful, artistic and original idea. I have seen how it works and has some good settings and options and can be made more things than only beautiful unusual artistic swirls Thanks for uploading this The only possibly negative thing I see is the name What I mean with more than swirls is this shown here For example take the default preset of Gradient Circles by Skybase 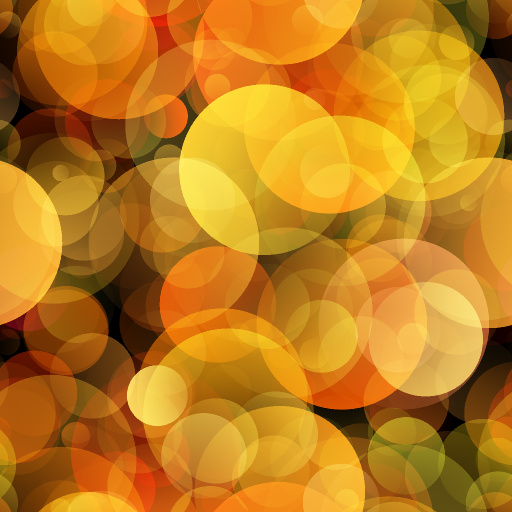
and then using the settings shown you can get this also interesting effect without the swirl part |
|||||
| Posted: August 27, 2013 3:53 am | ||||||
|
SpaceRay
|
And changing only the Outline smooth value from 0 to 100 you can get this other
|
|||||
| Posted: August 27, 2013 9:56 am | ||||||
|
SpaceRay
|
And now let´s use really the filter with the swirls using the same gradient circle preset of above and the settings shown to get this golden beautiful swirls
|
|||||
| Posted: August 27, 2013 10:01 am | ||||||
|
SpaceRay
|
And instead of having solid swirls as above, you can have also line based swirls, using the same source as above
|
|||||
| Posted: August 27, 2013 10:06 am | ||||||
|
SpaceRay
|
And using same source as above and using the first default presets as base and then modify the setting as shown you can get this beautiful green rainbow that looks as it was made with with cross polarized light photography
 |
|||||
| Posted: August 27, 2013 10:10 am | ||||||
|
SpaceRay
|
And using exactly same source as in first post, and using preset 5 without any modification, surprise, surprise, you get these artistic amazing amount of swirls that looks maybe like fractals in some way
|
|||||
| Posted: August 27, 2013 10:24 am | ||||||
|
SpaceRay
|
And then using preset 3 using same source as first post, and slightly modify settings, you get this ghostly color swirls
|
|||||
| Posted: August 27, 2013 10:29 am | ||||||
|
SpaceRay
|
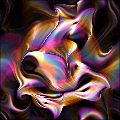
Now let´s change the source image to this one below, taken from my filterAlphabet Photos and using default preset 1 as base and modified as shown
And will give a much more artistic and beautiful result that I like much |
|||||
| Posted: August 27, 2013 10:37 am | ||||||
|
SpaceRay
|
And from the one above here, I have ONLY changed the Gradient to value 1 and got this beautiful and artistic green rainbow like swirls
|
|||||
| Posted: August 27, 2013 10:41 am | ||||||
|
SpaceRay
|
And to get an even more artistic swirls that would be much like and artwork is this one that uses the same typographic source above but using default preset 8 without any other modification
|
|||||
| Posted: August 27, 2013 10:48 am | ||||||
|
SpaceRay
|
Here I am using some plain color rainbow stripes with rainbow filter
|
|||||
| Posted: August 27, 2013 10:54 am | ||||||
Skybase
 |
Some notes: This filter was created for a comic I'm working on "And Then He was Gone". While the comic isn't ready for publication I decided to publish one of the filters created for the series. I was very curious of what others would make of this filter.
The filter also has the capability of producing HDR images (yes 16 or 32 bit!), you'll need to use TIFF, TGA, PNG, EXR, BMP, or PFM for the export. Just make sure you uncheck "clip HDR" before you export. That button was intended for preview purposes. Also do note that anti-alias was disabled in order to decrease the render speeds! I designed the filter so it doesn't require anti-aliasing at all. However, you can always enable it anyway, it honestly just helps reduce some of the morie patterning (interference patterns with crossing lines) but the overall visual imagery shouldn't be significant. Note that this is the FilterForge Library edition. The original version has several more features to help with some of the work on the comic. There are alternative blending methods, alternative swirl patterns, self-generating capabilities, and several color tools to aid processing complex imagery. But the library edition does just as much as what I have here. Regardless, a lot of time and effort went into assure enjoyable results. Hope people enjoy it  |
|||||
| Posted: August 27, 2013 11:35 am | ||||||
Mardar
 |
Awesome filter Skybase. Just beautiful work.
|
|||||
| Posted: August 27, 2013 6:40 pm | ||||||
|
SpaceRay
|
Beautiful artwork you have put as example, like it.
Well, it does not matter that this is a lite version with less features, I like much what is already included, and of course that you decide what to include and what not, and I understand very well and I would do the same as you.
So this why the "clip HDR" is included as it did not know what this was for Color ribbons But what I do not know and can´t see what is for the "color ribbons", it seems that it does nothing I can see in the result, or I am missing something, or using wrong settings. When opening the filter and click on the checkbox, I have seen that this makes plain bar colors instead of the gradient bars, but then on the result, I do not see any difference, so sorry that I could not discover yet, what is this for. |
|||||
| Posted: August 28, 2013 6:02 am | ||||||
|
Skybase
|
Yup that's it. Nothing more. It's not so obvious until you crank iteration counts higher. Probably will make a version that hosts a different method of dealing with gradients. Something more flexible than the way it's implemented currently. |
|||||
| Posted: August 28, 2013 6:10 am | ||||||
|
SpaceRay
|
Oh, yes, I have just tested it with the default preset and 91 iterations and as you said is then that you can see the effect making the colors better and with more gradients when activating this "color ribbons", in lower iterations it just only changes the color but not in the same way, good to know, thanks |
|||||
| Posted: August 28, 2013 1:57 pm | ||||||
|
SpaceRay
|
I found something interesting, I have loaded an image with transparent background and found that this filter makes a curious and good effect with this one, and all the transparent is converted to black, and all the swirls will only appear in the non-transparent areas, so this combined with the good black, can get beautiful effects.
|
|||||
| Posted: August 30, 2013 6:42 pm | ||||||
|
SpaceRay
|
Here I have taken a plain document and painted with the brush some abstract shapes, and then deleted all the others parts so that they are transparent and they applied this filter and got this
|
|||||
| Posted: August 30, 2013 6:57 pm | ||||||
|
SpaceRay
|
This alpha mask (transparent background shown in the above 2 posts) can be also useful to make some kind of frames
|
|||||
| Posted: August 30, 2013 8:17 pm | ||||||
|
SpaceRay
|
This above is made with this black frame shown here
|
|||||
| Posted: August 30, 2013 8:28 pm | ||||||
|
SpaceRay
|
Then thought to make another experiment with black square frame, and instead of just one big frame on the borders, why not have some more inside?
So I have made the following in Photoshop: Have taken this black frame above here and reduced it in width and put it more inside, then I duplicated the layer and reduced the square inward, and then I duplicated again and reduced more, then after having the 3 layers, I selected the layer with the smallest square and then go to Filter--> Filter Forge 4 Here is the result that I have described |
|||||
| Posted: August 30, 2013 8:37 pm | ||||||
|
SpaceRay
|
So as said when activating the FF 4 plugin, I choose this filter and select the default first preset and only change slighty the settings and got this shown below
Is curious and good that having selected only the smallest area layer, the other two layers ALSO appear and are included inside FF and is influencing how the design works |
|||||
| Posted: August 30, 2013 8:41 pm | ||||||
|
SpaceRay
|
And then after using the same one as above here, and reducing the Swirl scale, I got this other one
Both of this have the Gradient Input value 1 |
|||||
| Posted: August 30, 2013 8:44 pm | ||||||
|
SpaceRay
|
After all the experiments with the transparent background above, I have some colorful stripes that I have used here to get this nice result
Used preset 8 and from there modified the settings as shown here |
|||||
| Posted: August 30, 2013 9:05 pm | ||||||
|
Skybase
|
In the construction process the filter just uses a completely black background layer separate from the stuff you input. So no matter what you feed in, the result will be on a black output. The library version features a simple additive output. In order to use this on any other layer, I recommend blending the layer using linear dodge (add) or screen as well as other additive blend modes.
Just to tease... in the original non-library version there were multiple blending mechanisms. For example geometric mean mode with bias.  |
|||||
| Posted: August 30, 2013 11:47 pm | ||||||
|
Skybase
|
Alternatives methods of blending.
 |
|||||
| Posted: August 31, 2013 12:16 am | ||||||
|
angelize
|
Ooooh I like those last two! I've been playing around with this filter and I found I got some interesting effects by adding stretch and angle sliders to the distortion component.
 |
|||||
| Posted: September 9, 2013 5:05 am | ||||||
|
angelize
|
How can I tweak the filter to be able to have the beautiful swirls without the black background as you have in the non library version? If you can give me a "for Dummies" version would be helpful I'm still learning about the looping
|
|||||
| Posted: September 10, 2013 4:19 am | ||||||
|
Skybase
|
angelize, I answered you privately via email.
I'll probably talk about the technical stuff more openly about how stuff works once I'm done with the project itself. |
|||||
| Posted: September 10, 2013 5:29 am | ||||||
|
SpaceRay
|
Well, I have tried to change the black to another color, but it does not work, BUT there is an easier way that does not involve modifying the filter. Render the result in black and then use the Peel Off White 2013 by Shift Studiobut modifying the filter as I have suggested so you can be able to use it also with black and not only with white Here the default preset 1 
And here is the same one after using Peel off "black" filter and then made a new layer with white background  |
|||||
| Posted: September 10, 2013 5:04 pm | ||||||
|
SpaceRay
|
And as Skybase have suggested, you can also use blend modes to modify the result
I have used here the blend modes in Photoshop with a copy of the layer, but it will be the same with any other software that uses blend modes or even with FF itself. Here I have duplicated the original transparent layer, and then I have used "normal" blend mode on the first, and "Linear Light" blend mode on the second and have modified the Hue range a little  |
|||||
| Posted: September 10, 2013 5:18 pm | ||||||
|
Skybase
|
One of those things. Just do this and that and it works itself out. Let it loose they say. Let it loose. Like a swirl of time and rainbows all the mix here to there.
|
|||||
| Posted: September 10, 2013 9:50 pm | ||||||
|
SpaceRay
|
UNMULTIPLY - DIRECT BLACK BACKGROUND REMOVAL
I have just found that there is another filter that removes black background that does NOT NEED to be modified to use it, is directly from the FF Library. UnMultiply by ayato@web
It works very well and gives great result, so you do not need to modify the Peel off white filter. REMOVING BLACK BACKGROUND TO BE ABLE TO MIX SWIRLS IN DIFFERENT LAYERS After trying these filters to remove the black background I had the idea that once it has the transparent background, it could be used to duplicate the layer and then mix the copies of the result using blend modes, and then you can choose the background that you want in the first layer. I have used as result from this filter, the one I have already made shown in a post above This is how I have done it to get the final result shown at the end based on this image shown here 1 - Use this Rainbow filter in Photoshop to the get the result you want 2 - Remove the black with the Unmultiply filter or Peel off white (converted to black) be aware that it is applied to a unlocked layer. 3 - Enlarge the canvas width with so when rotating or modifying the result it will not be lost some parts of it outside of the canvas 4 - Put a new layer as background and fill it with what you want 5 - Duplicate the rainbow filter result, that is now transparent, as many times as you want, I have made 4 copies 6 - Use blend modes to mix the layers, I have used Linear Light for the first layer as the background is black, and then the others layers use Screen blend mode 7 - Rotate, modify and/or change the position of the layers and experiment of what you can do with them. 8 - You can modify also the layers together or individually, you can change the hue, or any other thing to get different effects. I applied a Hue adjustment layer so it changed all the colors from the original result 9 - Erase any unwanted parts of any of the layers that could not fit well Here is the final result I have done with 4 copies of the image shown here above and rotated in different angles and changing the hue range to all the layers |
|||||
| Posted: September 11, 2013 3:20 am | ||||||
|
Skybase
|
Let me keep it brief: it's possible to allow alpha channels to happen at the core level. I rebuilt the filter from scratch just to get a fresh perspective on it.
Credits: Betis helped solving some mystery and some clean up as well.  |
|||||
| Posted: September 11, 2013 5:11 am | ||||||
|
SpaceRay
|
You did not have to bother about this unless you wanted to do it yourself, because I did not suggest to do it, as it can be easily be done with the combination of the two filters. And I have done it only after the angelize question, and found that removing the black could be useful for more things. But as it seems that you have already done it and thanks to Betis is possible, would be good to know how it is done. |
|||||
| Posted: September 12, 2013 4:27 am | ||||||
|
Skybase
|
A bit of update on some progress. I'm working out the rest of the filter. Now it's got colors.
 |
|||||
| Posted: September 12, 2013 7:02 am | ||||||
|
SpaceRay
|
Good news that seems that you are making a new upd ate to the filter, but I would suggest to take your time to make it right and as you want it, and with only the things you want to have it.
I also like the original filter, so I think it must be possible to make the same things as before, or if this is not possible maybe you could do a different version, and if you do want to have a new version the alternative is to make a copy of the original as a backup and then have the new one. Sorry to ask, why "Outline Amount" is called this way? because I do not see that it has effect only in the outline, and is a global thing, for me and from the tests I have done is more like a brightness or darkening se tting
Sorry that I do not know what you mean with this, as before you could already choose 5 gradient colors, and choose the gradient input 2 so what is different now with the new update? |
|||||
| Posted: September 12, 2013 3:19 pm | ||||||
|
Skybase
|
Filter's got quite a significant alteration. It's the same structure, just differences in how stuff is handled.
Outline Amount alters the threshold amount creating the init outline image which gets distorted between a range. Brighter appearances are caused by the additive properties of the filter. When there's more to add: the brighter it gets. New update just introduced previous features in the alpha version. Much of the filter's done at this point minus some features that I decided were kinda not so useful after all. |
|||||
| Posted: September 12, 2013 11:33 pm | ||||||
Join Our Community!
Filter Forge has a thriving, vibrant, knowledgeable user community. Feel free to join us and have fun!
33,820 Registered Users
+14 new in 30 days!
153,732 Posts
+17 new in 30 days!
15,381 Topics
+5 new in 30 days!
Online Users Last minute:
27 unregistered users.
Recent Forum Posts:
- Guide on how to use texture maps PBR export with Filter Forge for 3D by SpaceRay
June 24, 2026 - PBR work flow...? by SpaceRay
June 24, 2026 - Chaos Fields by Ramlyn
June 21, 2026 - Unleashing creativity art with the help of filter forge 11 by EAdams
June 14, 2026 - FF 11 and FF 12 Studio animations that could maybe be done I think by CFandM
June 8, 2026 - BB - BubbleBlocks by Ramlyn by Ramlyn
June 2, 2026 - Dragon Distort II by Wolfgang Halder by Wolfgang Halder
June 1, 2026 - Multi Refraction by aaron Harris by SpaceRay
June 1, 2026 - Flashing Messages 3x6 by Rachel Duim by SpaceRay
May 28, 2026 - New awesome TEXT component FF 14 - How to get the most of it? by SpaceRay
May 28, 2026 - Just dropping in to say by Rachel Duim
May 24, 2026 - Veggie Rock by Vanblam by dactilardesign
May 22, 2026