|
Sphinx.
|
||||||
| Posted: March 9, 2011 5:24 am | ||||||
|
Sphinx.
|
Finally in!
This filter is much welcome - I will return with further comments when I understand what the heck is going on in there - good work! |
|||||
| Posted: March 9, 2011 5:25 am | ||||||
| jitspoe |
Thanks. It's pretty simple. I just do a dot product with the normal for basic lighting (made a separate snippet for HDR normal maps for those who just care about that) and walk along a ray from each sample toward the light source and check if the heightmap is ever higher than that ray. If so, value = 0. Multiply blend the result with whatever your surface color is, then throw the whole thing into FF's lighting with a lot of ambient light to get the ambient occlusion.
|
|||||
| Posted: March 9, 2011 9:51 am | ||||||
| jffe |
Variation #1 looks pretty realistic, and variation 6 reminds me of some old filters I was making a year or two ago, making *fake* shadows for a 3-D look without using the HDR lighting mode. Cool stuff.
jffe Filter Forger |
|||||
| Posted: March 9, 2011 11:22 am | ||||||
Betis
 |
This combined with the new Satellite Image filter could do wonders.
Roses are #FF0000
Violets are #0000FF All my base are belong to you. |
|||||
| Posted: March 10, 2011 8:29 pm | ||||||
| jitspoe |
Sure, why not? Too bad it takes like an hour to render, and the mountains are a bit rough, so the shadows are all spiked. I'm tempted to make a shadow-friendly satellite filter now.
 |
|||||
| Posted: March 11, 2011 2:06 am | ||||||
| jitspoe |
Did another test with some slight blur - looks better and renders faster, too!
 |
|||||
| Posted: March 11, 2011 2:08 am | ||||||
|
Betis
|
are you rendering it on top of the diffuse map or the already surface-lit product of the satellite? But I can see that it doesn't look as great as I had imagined. Try a more "solid" terrain? Wait I can do this, why am I ordering you to haha
Roses are #FF0000
Violets are #0000FF All my base are belong to you. |
|||||
| Posted: March 11, 2011 5:42 pm | ||||||
| jitspoe |
More solid like this?
I think there's just too much noise in the trees for this to work well. It wasn't designed with shadow casting in mind.  |
|||||
| Posted: March 12, 2011 1:04 am | ||||||
|
Betis
|
it's a little hard to tell where the shadows are but when you look closely it actually looks pretty good.
btw you inspired me to create your anti-filter, ambient occlusion Roses are #FF0000
Violets are #0000FF All my base are belong to you. |
|||||
| Posted: March 12, 2011 1:13 am | ||||||
| jitspoe |
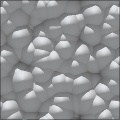
I dropped the heightmap down to 25%, and I think it looks a little better - less noisy, more like trees.
Attached the original w/o shadows for reference.  |
|||||
| Posted: March 12, 2011 1:15 am | ||||||
| jitspoe |
Aww, thought editing would allow me to attach 2 images. Here's the lowered heightmap version:
 |
|||||
| Posted: March 12, 2011 1:17 am | ||||||
|
Betis
|
def better
Roses are #FF0000
Violets are #0000FF All my base are belong to you. |
|||||
| Posted: March 12, 2011 1:36 am | ||||||
|
Betis
|
I modified your filter to accept already-AO'd images, color the light source, and control exposure. My ambient occlusion filter is used on the image/height initially, saved then used the result as the image into your filter, using the same height map, where I have your filter generate it's stuff and simply use an add component to combine the two. Pretty good huh? I love Qbert.
 Roses are #FF0000
Violets are #0000FF All my base are belong to you. |
|||||
| Posted: March 12, 2011 2:28 pm | ||||||
| jitspoe |
Qbert 3.0? Looks like it's still a little rough around the edges... literally.
|
|||||
| Posted: March 13, 2011 7:42 pm | ||||||
|
Betis
|
Yeah I think that's due to jpeg compression artifacts or something, but then again it gives it a little realistic feeling hehe
Roses are #FF0000
Violets are #0000FF All my base are belong to you. |
|||||
| Posted: March 13, 2011 10:38 pm | ||||||
| jitspoe |
Kind of looks like a giant stack of pool cue chalk. All we need now is radiosity.
I'm not sure I understand the need to render AO separately. Are you doing that in a different program or something? |
|||||
| Posted: March 14, 2011 12:13 am | ||||||
|
Betis
|
Funny you mention that. I made my own filter to do AO to save render time, but then I combined them because the light math was actually incorrect, and my AO filter was really fast (2 seconds for a full 1080p image). It looks better now and is about 50x more convenient hahaha. I'm working on an "export HDR" filter that clamps all positive values to 0-1. That's the easy part ( x/sqrt(x^2 + 1) ), but I need a formula that will reconvert those numbers into their original HDR values.
Roses are #FF0000
Violets are #0000FF All my base are belong to you. |
|||||
| Posted: March 14, 2011 12:27 am | ||||||
Crapadilla
 |
Oh man, this is awesome!
--- Crapadilla says: "Damn you, stupid redundant feature requests!" ;) |
|||||
| Posted: September 4, 2011 6:56 am | ||||||
|
SpaceRay
|
Amazing and awesome effect, realistic and well done, very Interesting and useful!!
Love much how the lighting and shadows can be configured and are well done according to the source. Also like that it has been included a lot of sources to try it on. Thanks very much and congratulations for the idea |
|||||
| Posted: July 2, 2012 10:30 am | ||||||
|
SpaceRay
|
I have just discovered that the "Surface Height" setting inside the Lightning tab, is very important and changes the shadows results and gives even better results with some settings
The bad side effect is that it will introduce some dark noise dithering Here is an example  |
|||||
| Posted: September 17, 2013 6:41 pm | ||||||
Skybase
 |
That "dithering" is Ambient Occlusion. Change AO settings from draft to low/medium or anything. Custom settings can help with getting optimum results.
Getting the hang of FF?  |
|||||
| Posted: September 17, 2013 9:46 pm | ||||||
|
SpaceRay
|
OH, YES! You are right, this was something I discovered sometime ago while using other filter, but I forgot completely about this as I really do not use much this part of the settings. And I know why is by default on "draft", because if you rise the quality it will be much slower Thanks for remembering me this and for you all your help.
Yes, well I am trying to understand an learn all the related things of FF and how it works and how can thing be done, and thanks to you and others users in the forum is easier. Here is the new example using Preset 5 with AO (Ambient Oclussion High quality) that shows much better the shadows. |
|||||
| Posted: September 19, 2013 12:27 pm | ||||||
| jitspoe |
You can also adjust the AO settings to make it darker without adjusting the surface height, as modifying the surface height also alters the other light behavior (though it's a bit more subtle here, since most of the lighting is coming from the script, not FF).
To be honest, I think the taller surface height makes the AO shadows look too excessive and unnatural, but it depends on what you're using it for. |
|||||
| Posted: September 19, 2013 9:17 pm | ||||||
|
SpaceRay
|
Do you mean adjusting the settings available in there "more settings" button? Because if you only use the black point setting to make it darker it does not work as expected. Here is an example, although surely I am doing it wrong here, as it should be a combination of different settings and not just only one setting  |
|||||
| Posted: September 21, 2013 4:35 am | ||||||
|
SpaceRay
|
Yes, sorry that I did not say anything about this, I have seen as you say that with higher surface height the shadow becomes much more stronger, and I agree with you that the example above can be too excessive and you could modify the lighting so is not so hard and strong, I just wanted to make it strong in that example and did not modify it so you could clearly see the difference between both. |
|||||
| Posted: September 21, 2013 5:18 am | ||||||
|
Sharandra
|
you could also render out the AO map instead of baking it in, and then blend it over the image in Photoshop.
|
|||||
| Posted: September 21, 2013 5:32 am | ||||||
|
SpaceRay
|
Here I have done a better example showing a less excessive shadow and with a similar lighting intensity of the original still using a high surface height BUT also rising the Brightness and Black Point, also is important to change the AO to High so it looks good.
And As said before, for me it looks better the one with higher surface height and added brightness than the default preset 5, but of course, as you said, it depends for what you want and what effect you really want to get. Another alternative If you are not happy with the direct result from FF, you can also modify easily the lighting with Photoshop or any other similar graphic software.
Yes, this could be possible too as an alternative  |
|||||
| Posted: September 21, 2013 5:52 am | ||||||
| jitspoe |
I've never moved the black point. I think that's just a hard point when things turn solid black. Try playing with the midtones instead.
|
|||||
| Posted: September 22, 2013 10:34 pm | ||||||
|
Skybase
|
Honestly wouldn't know when you would have a situation needing that parameter. haha Feels like just a good option to have anyway.
It should be standard practice giving yourself legroom to tinker results. Just that I kinda get lazy and don't bother with layers. You then later realize "oh god, it's too dark" so you wanna change it but then you gotta re-render the whole thing. Designer life tip 928: Always render passes, it saves time. |
|||||
| Posted: September 23, 2013 2:56 am | ||||||
|
SpaceRay
|
OH, yes, you are right, sorry, is true that using the midtones gives a better result and does not make it too much black and hard. I am trying to learn more and experiment with the shadows inside FF, as this is a very important thing. I have put this thread to know all I have seen about Shadows in FF Simulating real shadows inside Filter Forge - compilation of threads |
|||||
| Posted: September 23, 2013 11:48 am | ||||||
Join Our Community!
Filter Forge has a thriving, vibrant, knowledgeable user community. Feel free to join us and have fun!
33,799 Registered Users
+11 new in 30 days!
153,698 Posts
+7 new in 30 days!
15,373 Topics
+42 new in year!
Online Users Last minute:
9 unregistered users.
Recent Forum Posts:
- FilterForge as an Art Tool by SpaceRay
yesterday - Chaos Fields by Rachel Duim
April 12, 2026 - Concerning forum spam by CFandM
April 9, 2026 - Built In Preview Missing Error by GMM
April 8, 2026 - Geometry Spinner by Rachel Duim by SpaceRay
April 8, 2026 - Hyperbolic Tiling Challenge 2018 expand the original idea with FF 7 by SpaceRay
April 5, 2026 - About using Filter Forge for processing a video file with filters by SpaceRay
April 5, 2026 - FF 11 and FF 12 Studio animations that could maybe be done I think by SpaceRay
April 5, 2026 - Ramlyn's Filter Library by SpaceRay
April 5, 2026 - Adaptive Tiling by byRo by Ramlyn
April 3, 2026 - Flipping Image Animation by Rachel Duim by SpaceRay
March 29, 2026 - Suggest a new filter. by SpaceRay
March 29, 2026