Britt

Posts: 12 |
I am brand new to FF. I am wondering if it is possible to create a filter that will take greyscale input that shows depressions as black and bumps as white, and then generate wrinkles oriented longitudinally between the light and dark areas? I am looking to create bump maps for objects like pillows and table cloths where you might have buttons and bumps effecting the lay of the cloth wrinkles.
I see lots of interesting filters that are based around specific angles or random noise, but nothing that pay attention to an input image height map. So basically I am looking for something like a plastic wrap, but pays attention to the input image for orienting the direction of surface wrinkles. Any expert help or pointers would be greatly appreciated. Britt |
|||
| Posted: September 3, 2009 6:03 pm | ||||
|
Kraellin
|
ok, if i'm reading you right, you want something that will map out a height map and apply it to the same image?
or do you want two imported images, one a height map that is applied to the second? if that's the case, it cant currently be done. you can only use one imported image in this version. we're hoping that changes in version 2.xx. let's go back to the first one. FF can output height maps based on the filter. you could use those. just import your image and spit it out as a bumpmap. not so elegant, perhaps. you could also import a regular image, desaturate it and put it as the height input on a surface filter. let's take your button example. let's say you had a photo of a shirt with buttons down the front. and let's crop the whole thing so that your photo is now a closeup of just one button. now, you've still got the real world lighting on that photo. you open it in filter forge, and in the editor, you use an 'image' component. your photo will now show in that image component. plug in a 'desaturate' component and you now have a grayscale of your original in the thumbnail on the desaturate component. plug that into the height node of the results component (you'd have to change the results component to a surface type first) and you'd now have your height map based on that photo. ok, i'm going to quit for the moment, since i may not even be describing what you want. lol. let me know. If wishes were horses... there'd be a whole lot of horse crap to clean up!
Craig |
|||
| Posted: September 4, 2009 12:59 pm | ||||
|
Britt
Posts: 12 |
Craig,
I am not expressing myself well enough I guess. You are describing something I can do in Photoshop. I do 3D illustration. I am in need of custom bump maps for wrinkly, cloth like surfaces. I want the wrinkles to bare some relationship to the object I am trying to create in 3D. This means objects that have bumps, pits and seams/edges. What intrigues me about FF is the ability to make winkles procedurally. If I can get the wrinkles to have some sort of relationship to a height map, I will end up with a new height map that has wrinkles I can use as a cloth bump for my 3D model. The requirement is that to look reasonably real the direction of the wrinkles needs to vary depending on the gradient between the lights and darks of the input image, basically behaving like iron filings around magnetic poles in a 2D plane. Britt |
|||
| Posted: September 4, 2009 1:52 pm | ||||
|
Indigo Ray
|
Welcome to FF! Now let's see...
There's a component in FF called a refraction which bends an image based on a height input. In your case, you might want to take a smooth repeated mirrored profile gradient (maybe a noise gradient/perlin noise?) and plug that into the image input (this will be your wrinkles). Your black and white bumps (an image component) would get attached to the height input. The wrinkles would then bend to the bumps. Adjust the refraction slider accordingly. Then you overlay that onto your original grayscale image to get a bump map. Fortunately, this snippet does that for you. Next time, I might be so easy on you. 
I hope this all helped. Wrinkles.ffxml |
|||
| Posted: September 4, 2009 8:43 pm | ||||
|
Britt
Posts: 12 |
Indigo, That is an interesting formula. But it is still not doing what I need. I played around with it and added a few things to see if it could be made to work, but I still do not see it doing the job.
Theoretically, I am starting out with an image like the one below, and trying to get wrinkles oriented around areas of higher gradient change rates. The second image below is tediously done by hand in Photoshop for another project, so it does not "match" the first image. Any further suggestions would be highly appreciated. 

Britt |
|||
| Posted: September 8, 2009 10:34 am | ||||
CorvusCroax
 |
Britt/ Betis:
Interesting problem. I don't think there is any super easy built in way to make 'folds' from an arbitrary topology. Ie how to get the wrinkles to 'focus' in the corners. You can certainly do it if you know the general topology (all in the center, in 4 corners, etc) but to do it arbitrarily is the trick. We've been talking on the forums about this sort of effect in the context of landforms and erosion. LINK Betis: You might try using the 'Highpass at 100' trick, using a few intersecting perlin noises. Cracking and Branching I think it might be possible to create some branching using that, and then distorting it around the height using threedee's super clever Get X, Get Y technique: Get X Get Y |
|||
| Posted: September 8, 2009 11:47 am | ||||
|
Kraellin
|
britt,
what your second image shows me is something that can be done in FF. you've got a bumpmap based on the lights and darks of the first. that can be done. you've also done some stretching, or what looks like that, and that also can be done. basically, what you do is take a threshold component into an alpha and mask out either the lights or darks (based on the alpha) and set to sensitivity by the threshold. i'd then add either a noise distortion to warp the results of the previous step or use a perlin and some blends to add in some stetching. at least, that's what i'm currently seeing in my head... actual results may vary (and often do, in my case If wishes were horses... there'd be a whole lot of horse crap to clean up!
Craig |
|||
| Posted: September 8, 2009 2:29 pm | ||||
|
Kraellin
|
let's see if this is at all close to what you want. now, this outputs transparencies, but that can be filled in if needed.
Bumpmapper 1.ffxml If wishes were horses... there'd be a whole lot of horse crap to clean up!
Craig |
|||
| Posted: September 8, 2009 2:35 pm | ||||
|
Britt
Posts: 12 |
Craig,
I tried the filter, but I am not seeing any wrinkles. It does a good job of showing me how to get transparent whites however... perhaps you mean this to be part of a larger process? Britt |
|||
| Posted: September 8, 2009 2:53 pm | ||||
|
Britt
Posts: 12 |
I tried the XY and Cracks processes. Interesting but still not right. If I could get Cracks to orient properly it might work.
Britt  |
|||
| Posted: September 8, 2009 6:31 pm | ||||
|
CorvusCroax
|
Britt, why don't you post your ffxml file and we can take a look at it...
|
|||
| Posted: September 8, 2009 9:42 pm | ||||
| Apples |
Am I right to assume that you want to input an UVmap with rough placed wrinkles?
Maybe something like this? (based on Indigo Ray's filter)  May The Forge Be With You |
|||
| Posted: September 9, 2009 4:37 am | ||||
|
Britt
Posts: 12 |
Corvus,
Thanks for suggesting that. the filter is attached. Apple, Your assumption is not right. I am interested in starting with a bump map that shows general elevation changes and then have the filter generate the wrinkles oriented in the directions from light to dark or visa versa. The rough ones you have draw are way to rough to be realistic. Even the one I show above is not good enough. Using the pinch feature of the liquify tool in Photoshop can help fix it up, but that is a cruddy workaround as well. Britt Get X, Y Britt.ffxml |
|||
| Posted: September 9, 2009 9:15 am | ||||
|
Britt
Posts: 12 |
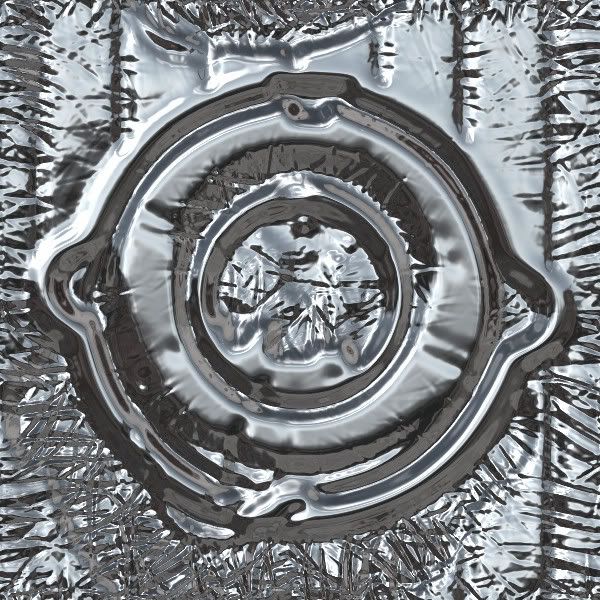
Maybe this will help to understand where I am coming from. The image below shows a Photo of a foil wrapped piece of a spacecraft. I had to hand paint bump maps for the whole spacecraft, which is covered in foil. As you can see below I did a fair job of it, but it could be better, and I would love not to have to spend as much time at it. Thus the search for a better way to generate cloth bump maps that react to the actual attachment points, or at least react to height changes by lining up the wrinkle orientations.
 |
|||
| Posted: September 9, 2009 9:29 am | ||||
|
Kraellin
|
ok, try this one. i still dont think i have it how you want it, but it might give you some ideas. also, are you aware of the bumpmap feature of FF? go to the main menu, pick 'filters' and then 'render maps' and turn on 'bumpmap'. that may lead you to some discoveries, also.
Bumpmapper 1b.ffxml If wishes were horses... there'd be a whole lot of horse crap to clean up!
Craig |
|||
| Posted: September 9, 2009 1:31 pm | ||||
|
Britt
Posts: 12 |
Craig,
Yes, I have been paying attention to the Bump channel in the render maps, as I expect that is the one I am going to want for output. The use of the noise component in your filter is one I have tried (see Get X, Y Britt.ffxml above) But the wrinkle orientation issue is still not on that has been come to grips with. Britt |
|||
| Posted: September 9, 2009 2:07 pm | ||||
| Apples |
I'm very interested if procedural wrinkling that flows in the right directions and looks realistic actually can be achieved. Untill then I'm doing all my wrinkles manually with zbrush. May The Forge Be With You |
|||
| Posted: September 9, 2009 5:37 pm | ||||
|
Indigo Ray
|
I see the problem. The refraction component bends the source around white areas, but it doesn't bend the source towards the black areas. You need something like a pinch/bulge effect. Photoshop does that, but it only uses a single value for the whole image, not a grayscale map. Maybe this filter will help?
|
|||
| Posted: September 9, 2009 6:30 pm | ||||
|
Britt
Posts: 12 |
Pinch Bulge does some interesting things, but still is not doing it.
Britt  |
|||
| Posted: September 10, 2009 10:21 am | ||||
|
Britt
Posts: 12 |
||||
| Posted: September 10, 2009 10:22 am | ||||
|
CorvusCroax
|
So I tried it my way and got non-amazing results. There is something about the get x get y thing I'm misunderstanding, I think. At high offset levels it tends to just look like topo lines, which is not what you want. I also tried putting it through a normal map filter first, and then extracted the X,Y from that, but again it's not working right yet. (my pattern is always 90 degrees in orientation from the way I want it...)
Hmmm... I see. So, you know that it's going to be tricky to get all the foil to tile nicely across your UV map, right? You might be better off just making a nice big crinkle - y patten an zbrushing that onto your geometry. Such as Foil by Vlad (FF + zbrush = awesomeness, btw) |
|||
| Posted: September 11, 2009 4:36 pm | ||||
ThreeDee
 |
Hi all, long time no see!
I might be a bit late on this, but I checked the forums today and this sounded like a good one to try and work out, so here's what I managed to put together. Render: 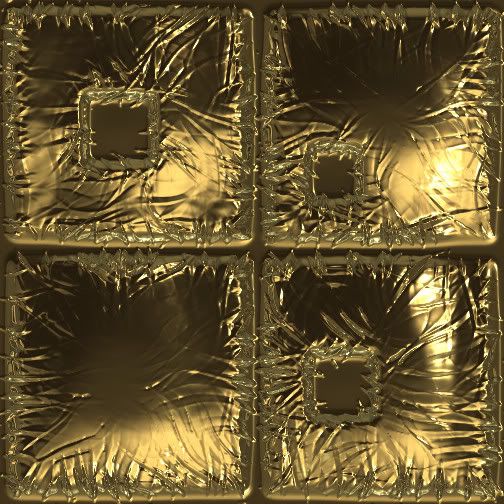
Bump map: 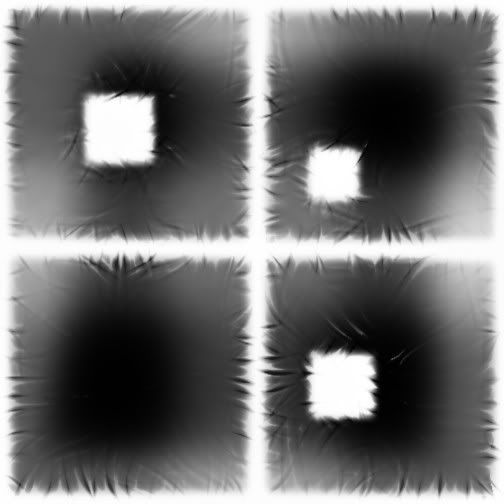
TD |
|||
| Posted: November 29, 2009 12:56 pm | ||||
|
ThreeDee
|
This is how it treats the LP.
 |
|||
| Posted: November 29, 2009 1:39 pm | ||||
|
Indigo Ray
|
Welcome back TD.
|
|||
| Posted: November 29, 2009 5:57 pm | ||||
|
Britt
Posts: 12 |
ThreeDee,
This is much closer to what I had in mind. Would you care to post your filter for examination? |
|||
| Posted: November 30, 2009 8:53 am | ||||
|
ThreeDee
|
Hi Indigo -- thanks. Yes, I guess you could replace the current Stones noise in the filter with Cells noise and make them bigger. I gave V2 a whirl just after doing the above filter. Bomber rules!
Britt -- certainly. Here you go. It is not optimized for all uses, but the first two things to try are "Invert height map" and "Blend style." After that, it is into the guts of the filter, modifying the input image levels might do the trick. Foil wrap.ffxml |
|||
| Posted: December 2, 2009 11:28 am | ||||
|
CorvusCroax
|
Hey, ThreeDee is back!
Welcome back! V2 is really cool... can't wait to see what you do with it. |
|||
| Posted: December 2, 2009 4:00 pm | ||||
Join Our Community!
Filter Forge has a thriving, vibrant, knowledgeable user community. Feel free to join us and have fun!
33,815 Registered Users
+14 new in 30 days!
153,728 Posts
+24 new in 30 days!
15,379 Topics
+5 new in 30 days!
Online Users Last minute:
20 unregistered users.
Recent Forum Posts:
- Chaos Fields by Rachel Duim
June 14, 2026 - Unleashing creativity art with the help of filter forge 11 by EAdams
June 14, 2026 - FF 11 and FF 12 Studio animations that could maybe be done I think by CFandM
June 8, 2026 - BB - BubbleBlocks by Ramlyn by Ramlyn
June 2, 2026 - Dragon Distort II by Wolfgang Halder by Wolfgang Halder
June 1, 2026 - Multi Refraction by aaron Harris by SpaceRay
June 1, 2026 - Flashing Messages 3x6 by Rachel Duim by SpaceRay
May 28, 2026 - New awesome TEXT component FF 14 - How to get the most of it? by SpaceRay
May 28, 2026 - Just dropping in to say by Rachel Duim
May 24, 2026 - Veggie Rock by Vanblam by dactilardesign
May 22, 2026 - Snippet - A refinement for terrain and world generating filters by David Roberson
May 17, 2026 - FilterForge as an Art Tool by Rod Detmer
May 7, 2026