|
SpaceRay
|
||||||
| Posted: March 18, 2013 4:05 am | ||||||
|
SpaceRay
|
WOW!!! This is really cool, and awesome and amazing work!! Love it much
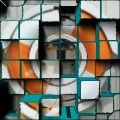
Sorry, that I still can´t believe that this really CAN be done in FF, I of course are using it already but is so special and great that I do not feel like it is real, it is too jawdropping for me Thanks really very much for making this beauty and great work. Fr om my point of view it has a great potential and many possible different uses and can be used with or without images, and when using without images it can be later added a overlay image using blend modes in Photoshop so it is all over the cubes like a film proyected image, like for example this one here below that is done the overlay in photoshop en the image goes over everything instead of only on the front of the cube 
SOME POSSIBLE ADVICE AND/OR HINTS AND TIPS? It would be good also to know if have some advice and hints or tips for this filter to be able to get the most out of it and use it in the best way, because I find some of the settings a little weird or confusing at first (perhaps because my fault that I have just used it only a few minutes) and would be better to know fr om the expert that made it. SOME OF THE BEAUTIFUL PRESETS I like mostly all the presets, but here is only a few 


I have seen that there are some presets that does not have sharp and defined edges and are soft an and also have great visible jagging pixel edges on the cubes borders, and using a higher antialias it keeps the same and does not get better 
Here is one example wh ere can be seen 
I will try to experiment and try more to see it better and why and when happens Below is just a quick test using preset 8 and have found this too in the reduced view, BUT then when using the "Actual view" it is seen much better and without the jaggies seen in the reduced view
Again thanks really very much for making and sharing this filter, like it much  |
|||||
| Posted: March 18, 2013 4:06 am | ||||||
|
SpaceRay
|
As shown above in the left you can see some great jaggies, BUT when viewed the same image and same settings in the "Actual view" they are gone and it looks very well
How is this possible? Is it that in reduced view the quality is not real and is seeing worse? Here is the sample in "actual size" view  |
|||||
| Posted: March 18, 2013 4:56 am | ||||||
Skybase
 |
Feels like what's feeding into the lookup component is the culprit. I donno, it's a challenge to properly make sharp extrusions on a 2D surface.
|
|||||
| Posted: March 18, 2013 5:03 am | ||||||
| voldemort |
As big a fan as I am of your skills and filters I hate to poke a whole in this one but one detractor is the fact that only a portion of the image is used. I fiddled with it real quickly by adding a scale component imediatly after the image component and setting it for .75 this seemed to fix this issue and allow the entire source image to be utilized. Again incredible filter and I hate to even consider poking a wholie in it but tis might be worth consideration
lets all whine for a wine port |
|||||
| Posted: March 18, 2013 12:20 pm | ||||||
|
SpaceRay
|
BUT, it seeems that it only happens in the reduced size and not when rendering the final image in real size, so perhaps is not a problem of the components and the feeding, as it would be the same in both cases and not only in the reduced view.
YES, same as you I do not like to poke and enter into filters and break the usage recording of the filter that the author would get but sometimes it may be needed, because as you say, the filter does not use the whole image you load and sometimes this is not good, so I will try what you have suggested and see how it works, and I agree that it would be a good suggestion to add this scaling of the source image and upgrade it so it can be used it from factory filters and not as a modified one. Here is another example I have done  |
|||||
| Posted: March 20, 2013 4:00 am | ||||||
|
SpaceRay
|
I have seen also that when the image is checked and activated all the cubes edges are very good defined with the mortar color of the tiles and all clearly defined, but if you uncheck the image option all these defined border edges are lost and disappear
Although I like much also the very good, wonderful and beautiful effect of the cubes without all the edges defined, I would like also to have a third option that could be like the unchecked version but with the edges of the mortar color too. And happily I have found a way to solve it and do it very easily , just go to "File -> New Image..." and enter the size resolution you want and choose "fill color" white color and so you can keep the image box checked but without having any real image Here is one example of what I mean by using File --> New image fill color white  |
|||||
| Posted: March 20, 2013 4:39 am | ||||||
|
SpaceRay
|
And this is the same as the one above when you uncheck the "image" checkbox
 |
|||||
| Posted: March 20, 2013 4:41 am | ||||||
|
SpaceRay
|
And the reason I want to have this in white is to be able to use the cubes rendered image later in Photoshop and use any image to be overlaid over it with different blend modes AND so it also the texture is applied to the whole cubes, even the sides of them and make a texture there too
This example below is by making two layers above the cubes with the same texture and apply to both a "overlay" blend mode, so as you can see the blue parts are textured too  |
|||||
| Posted: March 20, 2013 4:52 am | ||||||
|
SpaceRay
|
And here is using the unchecked iamge checkbox from above and then in Photoshop added one layer above with the texture using "Multiply" blend mode and then also modify the result with "curves" and "levels" and got this
as you can see here the texture covers everything, including all the sides of the cubes.  |
|||||
| Posted: March 20, 2013 5:00 am | ||||||
|
SpaceRay
|
Although the above one is not clearly defined the cubes edges and although it looks beautiful also as it is and may be good too in this way, it can be also possible to have more defined edges of the cubes by changing the blue one above to a grayscale color instead in FF
 |
|||||
| Posted: March 20, 2013 5:06 am | ||||||
|
SpaceRay
|
And then after using the model above here and then in Photoshop added one layer above with the texture using "Multiply" blend mode and then also modify the result with "curves" and "levels" (I use adjustment layers for this) and got this that shows better the edges slightly of all the cubes.
 |
|||||
| Posted: March 20, 2013 5:10 am | ||||||
ThreeDee
 |
Suggestion: Try using overlay mode and putting the image below the cubes layer.
|
|||||
| Posted: March 20, 2013 6:08 am | ||||||
|
SpaceRay
|
Oh, yes, is true that is a possible good idea too, and also can get good and different results in this other way, thanks. here below is an example using the blue cubes shown here below 
with overlay blend mode over the texture (layer below in Photoshop) and modifying the image lighting with adjustment layers  |
|||||
| Posted: March 20, 2013 6:31 am | ||||||
|
SpaceRay
|
I have made an Ampergram design with B letters and see here how to make this

and then using the great suggestion made by voldemort
and so following this I have been able to make this beauty that shows these letters above over the front of the cubes, because if this modification is not done, the letters appears broken. Also to fit the letters in the cubes as shown here you have to put the same amount of cubes as letters in the row (first setting) and then using the "depth" setting of the cubes so the sizes of the cubes fit just right to the size of each letter  |
|||||
| Posted: March 31, 2013 2:36 am | ||||||
| voldemort |
with a little bit of trial and error I was able to get all the controls to align so the end result always worked
--I should probably put this kind of time and effort in my own filters but my own filters are not near as good as threedee's lets all whine for a wine port |
|||||
| Posted: April 1, 2013 12:14 pm | ||||||
| Burt |
Thanks for this cool filter ThreeDee. Very cool and useable. Also a tip of the hate to SpaceRay for posting all those examples.
|
|||||
| Posted: April 6, 2013 12:36 pm | ||||||
|
SpaceRay
|
This kind of filters is one of the things I love about FF and that can not be found anywhere else
By the way the Ampergram website link above does not work anymore and have been disabled |
|||||
| Posted: June 8, 2020 11:05 pm | ||||||
Join Our Community!
Filter Forge has a thriving, vibrant, knowledgeable user community. Feel free to join us and have fun!
33,825 Registered Users
+12 new in 30 days!
153,741 Posts
+13 new in 30 days!
15,384 Topics
+5 new in 30 days!
Online Users Last minute:
9 unregistered users.
Recent Forum Posts:
- Ancient Free Packs!! by Shayne
8 hours ago - Double Mosaic by Ramlyn by Ramlyn
July 9, 2026 - New awesome TEXT component FF 14 - How to get the most of it? by CFandM
July 8, 2026 - Variable Kaleidoscope by inujima by SpaceRay
July 6, 2026 - Question about Upgrading to newest version by GMM
July 6, 2026 - Guide on how to use texture maps PBR export with Filter Forge for 3D by SpaceRay
June 24, 2026 - PBR work flow...? by SpaceRay
June 24, 2026 - Chaos Fields by Ramlyn
June 21, 2026 - Unleashing creativity art with the help of filter forge 11 by EAdams
June 14, 2026 - FF 11 and FF 12 Studio animations that could maybe be done I think by CFandM
June 8, 2026 - BB - BubbleBlocks by Ramlyn by Ramlyn
June 2, 2026 - Dragon Distort II by Wolfgang Halder by Wolfgang Halder
June 1, 2026