|
SpaceRay
SpaceRay

|
|
| Posted: January 31, 2021 1:55 pm |
Details
E-Mail
|
|
SpaceRay
SpaceRay
|
Weird and interesting idea, and seems to be cool, but can you be so kind to explain it more how it works and get the most out of it? As I am trying to understand how it works
It seems that you need to use the General part of settings to add the selected parts of the 5 possible selections but do not know how it works, sorry.
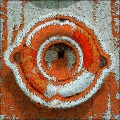
QUESTION 1 - On preset 18 can be seen that you have multiplied the Lionfish eye over the Lifesaver, but still do not know how is done. Fr om What I can see, when you switch the SeeResult/Selection checkbox you can see the eye selected in red, but how are they positioned in that way?
QUESTION 2 - the "See selection 12345" does nothing until you uncheck the switch the SeeResult/Selection, so if it is active then it means that it shows the Result? and then you have to uncheck it to see the selection, but for me and my personal point of view, if you put SeeResult/Selection, the See Result would be when it is not checked, and you need to mark the checkbox to be able to see the selection that is the second option
QUESTION 3 - Please how do you position the copies wh ere you may want of the 5 selections ?
QUESTION 4 - Please, could you explain some of the presets you have done and what they may show about the filter? I try to understand what you have done but do not know the difference.
thanks for your help
|
| Posted: January 31, 2021 1:57 pm |
Details
E-Mail
|
|
Ramlyn
Ramlyn

|
Basically the idea of this filter is to sel ect parts of images and use them as particles to compose your main picture.
It is possible to select up to 5 parts of images.
The controls menu is divided in 7 sections:
----- General -----
-------- 1 --------
-------- 2 --------
-------- 3 --------
-------- 4 --------
-------- 5 --------
----- Finalize -----
----- General -----
Here is where you can find the main controls for the whole result.
No matter how many parts of image (fr om 1 to 5) you use, these controls apply to all them.
Here you also have the controls that allow you to switch between the view of the result and the view of a single part of image.
"See Result/Selection" switches between the result and the parts of images, while "See Selection 12345" allows to choose what part of image you want to see.
These two controls are essential to use in combination with the following sections (-------- 1 --------, -------- 2 --------, -------- 3 --------, -------- 4 --------, -------- 5 --------), wh ere you go to choose the parts of images that you want to use.
-------- 1 --------
Contains the controls to select the part of image n.1.
"Selection 1 Y/N" confirms that the part of image n.1 will be used.
"Image 1" selects the image you want to use (fr om FF or external).
"Image 1 Scale" scales your image.
"Image 1 Offset X" and "Image 1 Offset Y" move your image.
"Image 1 Rotation" rotates your image.
"Selection 1 Radius": this control defines the area that you use for your part of image. The selection is done with a polygon, so that you can enlarge the area using this "Selection 1 Radius" control and do other adjustments using the following controls ( "Selection 1 Sides", "Selection 1 Corners", "Selection 1 Squash", "Selection 1 Bevel", "Selection 1 Rotation"). The polygon is surrounded with a red border, so that it is easy to see the selected area.
The sections -------- 2 --------, -------- 3 --------, -------- 4 --------, -------- 5 -------- are identical to the -------- 1 --------, and they operate on the part of image n.2, n.3, n.4, n.5.
----- Finalize -----
This section contains some final touch that can be given to the result to make it more attractive.
|
| Posted: February 8, 2021 7:06 am |
Details
E-Mail
|
|
Ramlyn
Ramlyn
|
| Quote |
|---|
SpaceRay wrote:
QUESTION 1 - On preset 18 can be seen that you have multiplied the Lionfish eye over the Lifesaver, but still do not know how is done. Fr om What I can see, when you switch the SeeResult/Selection checkbox you can see the eye selected in red, but how are they positioned in that way? |
You can easily do it this way.
Lets suppose to use the section -------- 1 --------.
Firstly uncheck "See Result/Selection". This way you will see your selection, not the final result.
On "See Selection 12345", select 1
Check "Selection 1 Y/N", then use "Image 1" to choose the Lionfish.
Now you should see the Lionfish with a polygon on it.
Enlarge, move and rotate (Image 1 Scale, Image 1 Offset X, Image 1 Offset Y, Image 1 Rotation) the Lionfish picture until you have inside your polygon the area that you want to use. You can also modify the size, the sides and other characteristics of the selection (Selection 1 Radius, Selection 1 Sides, Selection 1 Corners, Selection 1 Squash, Selection 1 Bevel, Selection 1 Rotation).
When you are done, just switch again "See Result/Selection".
|
| Posted: February 8, 2021 7:21 am |
Details
E-Mail
|
|
Ramlyn
Ramlyn
|
| Quote |
|---|
SpaceRay wrote:
QUESTION 2 - the "See selection 12345" does nothing until you uncheck the switch the SeeResult/Selection, so if it is active then it means that it shows the Result? and then you have to uncheck it to see the selection, but for me and my personal point of view, if you put SeeResult/Selection, the See Result would be when it is not checked, and you need to mark the checkbox to be able to see the selection that is the second option |
Yes, "See Selection 12345" must be used in combination with "See Result/Selection".
The only reason why I split in two controls is because I wanted to write "See Result/Selection 12345", but it was too long and FF did not accept it. So I decided to split it.
But you are right it may be not clear, so I may change it.
|
| Posted: February 8, 2021 7:27 am |
Details
E-Mail
|
|
Ramlyn
Ramlyn
|
| Quote |
|---|
SpaceRay wrote:
QUESTION 3 - Please how do you position the copies where you may want of the 5 selections ? |
It is not possible to put different selections in different areas. When you do different selections, they will be mixed together.
I also thought to have this option, but it would make the filter a bit too complex to understand, so I avoided it.
|
| Posted: February 8, 2021 7:39 am |
Details
E-Mail
|
|
Ramlyn
Ramlyn
|
| Quote |
|---|
SpaceRay wrote:
QUESTION 4 - Please, could you explain some of the presets you have done and what they may show about the filter? I try to understand what you have done but do not know the difference. |
What I did, preset by preset was rather simple.
First of all I selected different part of images. Even when all other controls have the same values, if you simply select a different image area, the result is completely different.
Then, in the ----- General ----- section, I played with the "Rotation" and "Depth Map".
They allow to dispose the parts of image in different direction and position.
Finally I also used the ----- Finalize ----- section to increase the contrast or the saturation, making some particular stronger.
I think that using images that have transparent areas (for example a tree with transparent background) can give interesting results, because you would not notice the shape of the polygon used for the selection.
|
| Posted: February 8, 2021 7:53 am |
Details
E-Mail
|
|
SpaceRay
SpaceRay
|
Thanks really much for your complete, detailed and full answer, will follow it and see what I can do.
|
| Posted: February 27, 2021 12:44 pm |
Details
E-Mail
|