KGtheway2B
 |
||||||
| Posted: April 20, 2010 8:32 pm | ||||||
|
KGtheway2B
|
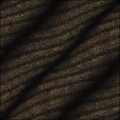
I can't believe nobody has commented on this yet!
Amazing job!! Your climbing rope texture is totally excellent as well. I'm excited to see your future stuff, hope you stick around and keep it up! |
|||||
| Posted: April 20, 2010 8:34 pm | ||||||
|
ronjonnie
|
Hey Kisakumedia,
YES! I Like It! VERY NICE! What is next? Have a GREAT day! Ron zazzle.com/Ronspassionfordesign*
So much to learn, so little time. |
|||||
| Posted: April 21, 2010 5:52 am | ||||||
|
Kraellin
|
uhm, can it do a single strand?
If wishes were horses... there'd be a whole lot of horse crap to clean up!
Craig |
|||||
| Posted: April 22, 2010 5:10 pm | ||||||
|
KGtheway2B
|
It is a single strand. It's designed to wrap around a cylinder.
Having a flat strand sitting with stripes of alpha beside them would be useless imo. |
|||||
| Posted: April 22, 2010 8:56 pm | ||||||
| tigerAspect |
Cool! I like the Diffuse map by itself more than the final texture
|
|||||
| Posted: April 22, 2010 9:10 pm | ||||||
|
Kraellin
|
say what now? how is that a single strand? grant you, i'm not a big 3d guy, so i'm not saying you're wrong, but i dont quite grok. care to explain or show an example of how that becomes a single cable, KG? If wishes were horses... there'd be a whole lot of horse crap to clean up!
Craig |
|||||
| Posted: April 23, 2010 4:29 pm | ||||||
|
KGtheway2B
|
Larger cables are made of a bunch of little cables twined together, then those are twisted together again. The big cable in this pic shows it.

Since the texture tiles both H and V you would simply wrap it around a cylinder (like I did with a column texture in this thread: http://www.filterforge.com/forum/read...ssage59607 ) then continue it vertically. Voila! |
|||||
| Posted: April 24, 2010 12:30 pm | ||||||
|
Kraellin
|
i know what cables are and how they're made. but to wrap that around a cylinder like you're talking with the column, the column was just one instance, not several like this cable is. but, quite true that i'm not a 3d man. i could see it if it's taking only a portion of the image and offsetting and then applying the other portion of the image...i think, but even at that, i still dont quite see it. anyone got an instance of applying this filter to a 3d wrap?
If wishes were horses... there'd be a whole lot of horse crap to clean up!
Craig |
|||||
| Posted: April 25, 2010 1:08 pm | ||||||
| Kisakumedia |
Thank you for all your comments!
I'm glad you like my filter and I hope it's of any use to you I see that there is some hot discussion going on there so I try to explain everything to you as good as I can. First of all, thank you KGtheway2B for your hard work trying to explain whats going on in 3D. Thank you Kraellin for your questions, I'm pretty sure, that there are more people who want to know how this will work in 3D. I made some quick screenshots to demonstrate how I use these textures in practice (these are the new textures, coming with the update, as soon as it makes it to the server I'm starting with the first preset that is rotated 45 degrees: 
Applied on a simple cylinder (with some bending): with visible edges 
without visible edges 
This is how it will look like on the 3D model, but in order to achieve this result, the UV-Layout (2D projection of all the 3D faces) has to be created. First of all, the screenshot of the UV-Layout: 
It shows all the faces of the cylinder. 
Link to full size Here you can see how the texture (that is tiled some times) is projected on to the 3D geometry, controlled by the UV-Layout. But how does it work with this texture? 
It's very simple in this example. Just rotate the UV-Layout instead of the texture: 
Link to full size I hope you could follow along with my little tutorial If you want some more detailled information, i could make a video tutorial or something like that but only if can spare some free-time. Have fun with my texture and try the updated version as soon as it is uploaded! |
|||||
| Posted: April 26, 2010 3:44 am | ||||||
|
Kraellin
|
thank you, kisa.
i guess what i dont get on all that is, why go through all those hoops? i mean, what's the advantage to doing things that way. it just seems pretty convoluted to me when you could make one 2d cable and simply wrap it around your 3d object. mind you, i'm completely lost on what this UV thing is. UV to me always meant ultraviolet and i can see that's now how you all are using it If wishes were horses... there'd be a whole lot of horse crap to clean up!
Craig |
|||||
| Posted: April 26, 2010 9:20 pm | ||||||
|
KGtheway2B
|
I don't understand how this is still confusing you...
Can you show an example of your supposed "non convoluted" method? |
|||||
| Posted: April 26, 2010 10:38 pm | ||||||
CorvusCroax
 |
(Note: I can't tell if you're kidding or not.) UV is how 3d programs apply 2d information (such as an image) to 3d information like a 3d model. Geometry w/ a UV map has X,Y,Z as well as U,V coordinates. Those U and V coordinates establish a 2d area, which is your texture. UV maps can look very different from the model.
You would still have to provide a UV map to apply the texture to any bending geometry. This method just allows the pattern to be repeated. This is extremely common, particularly when you need to save texture space. |
|||||
| Posted: April 27, 2010 12:47 am | ||||||
| Kisakumedia |
I guess what you mean is to make a photo from a real cable and wrap it around the 3D model, right? Or did you mean to make a texture of a single cable? Getting good images from real steel cables is very hard and even harder to make it fit to the desired 3D model. It's not impossible though. There are people who do it that way, but I think you have more control with self-created textures. If you meant to make a 2D cable texture and wrap it around, then I can tell you that this is exactly what I was doing here It may not look like it but this filter creates a piece of a cable, or several cables (you can set the repeat count to 1 to get only 1 cable piece). The reason why only a piece of the whole cable is used, is to safe texture space/resolution. In 3D, it's always better to repeat small textures than having one big texture. But that's an art of itself |
|||||
| Posted: April 27, 2010 2:52 am | ||||||
|
Kraellin
|
thank you, corvus. no, i wasnt joking. i've only worked in 3d just a tiny bit with game editors. so, they're mostly still a mystery to me. i had never heard of a uv layer.
ok, you're applying this a whole lot differently than i thought. and no, not talking about a photo here. what i would have thought, if i were trying to make a cable texture, would be you'd make a single image of a single cable, no extra faces or anything and simply apply it repeatedly end of cable end to end of cable end, that the single cable would wrap completely around your 3d model and you'd just repeat this for however long the cable was. as i look at your examples above, kisa, you're wrapping it almost horizontally, so that the individual strands of the cable are almost perpindicular to the vertical axis (the elongated axis in this case). i hadnt thought about that. ok, i think i get this now. i've not worked with 3d models for a while. i forgot you have all these faces rather than a single wrap. so, you dont want to have to slide each texture face down to make it work. ok, i see. thanks, kisa and might i add, pretty brilliant and a good texture. thank you for the help If wishes were horses... there'd be a whole lot of horse crap to clean up!
Craig |
|||||
| Posted: April 27, 2010 10:19 am | ||||||
Join Our Community!
Filter Forge has a thriving, vibrant, knowledgeable user community. Feel free to join us and have fun!
33,825 Registered Users
+12 new in 30 days!
153,741 Posts
+13 new in 30 days!
15,384 Topics
+5 new in 30 days!
Online Users Last minute:
6 unregistered users.
Recent Forum Posts:
- Ancient Free Packs!! by Shayne
2 days ago - Double Mosaic by Ramlyn by Ramlyn
July 9, 2026 - New awesome TEXT component FF 14 - How to get the most of it? by CFandM
July 8, 2026 - Variable Kaleidoscope by inujima by SpaceRay
July 6, 2026 - Question about Upgrading to newest version by GMM
July 6, 2026 - Guide on how to use texture maps PBR export with Filter Forge for 3D by SpaceRay
June 24, 2026 - PBR work flow...? by SpaceRay
June 24, 2026 - Chaos Fields by Ramlyn
June 21, 2026 - Unleashing creativity art with the help of filter forge 11 by EAdams
June 14, 2026 - FF 11 and FF 12 Studio animations that could maybe be done I think by CFandM
June 8, 2026 - BB - BubbleBlocks by Ramlyn by Ramlyn
June 2, 2026 - Dragon Distort II by Wolfgang Halder by Wolfgang Halder
June 1, 2026