Lucato
 |
||||
| Posted: February 19, 2013 2:26 am | ||||
|
Lucato
|
Amazing as all your filters ThreeDee! You should be hired by ff to develop filters for their next versions launches. :0)
I saw it in the forum. Thanks for submitting and sharing with us. I really appreciated that. All the best. Lucato. |
|||
| Posted: February 19, 2013 2:29 am | ||||
Skybase
 |
|
|||
| Posted: February 19, 2013 2:42 am | ||||
lipebianc
 |
This is fantastic!

AWESOME work! 
Edit: TIP => disable 'outlines' may increase rendering speed, for previewing/tweaking  "From the moment we are born, we start being filtered..." |
|||
| Posted: February 19, 2013 12:08 pm | ||||
|
SpaceRay
|
WOW!!
 I did not know it has already been published in the library!! GREAT!! I did not know it has already been published in the library!! GREAT!!
First of all congratulations for the Editor´s Pick award, you deserve surely for making this awesome and amazing filter and also thanks to FF for giving it. As Lipebianc said very well, fantastic and awesome work
Now that I have seen it, I like it much and is very well done and is MUCH more than what I have suggested in this other thread and you have added layers and drop shadows that looks very beautiful and gives a great effect. Also you have many possible variants and can customize it in different ways and get different effects with different settings, and with and without poligon outlines. And looking at how you have done the filters is also interesting and complex You are really a great master and expert filter forger  and admire the skills and experience you have and the ideas you have and admire the skills and experience you have and the ideas you have
Thanks very much for making this great and useful filter 
 |
|||
| Posted: February 22, 2013 1:30 pm | ||||
|
SpaceRay
|
I have put some possible suggestions and variations in this other thread
Polygon Fill by ThreeDee - Suggestions and possible variations Here one example I have made  |
|||
| Posted: February 22, 2013 3:00 pm | ||||
|
SpaceRay
|
and here is another one
 |
|||
| Posted: February 22, 2013 5:53 pm | ||||
|
SpaceRay
|
I have already put the request and question in the other thread but I want to put it also here.
After some time testing it, I think that it would be good and useful that you could update your filter allowing to have images in the color controls of the layers and background, as it gives MUCH MORE options, variation and possibilities. This change would keep the same features and same filter that you have already made and nothing would be changed as the randomizer can´t load images by itself. And I could use this filter in the "legal" way being able to use it in the official way and being giving you the deserved usage ranks. BUT of course, this is all your decision and up to you, and is only a suggestionand you can do whatever you want as is your filter and will respect what you want and like |
|||
| Posted: February 25, 2013 8:37 pm | ||||
|
SpaceRay
|
Sorry to ask this, and I am sorry that is could be easy, but I do not understand what the mask fill is for?, and how can be used?
|
|||
| Posted: February 27, 2013 3:23 pm | ||||
ThreeDee
 |
The mask fill can be used if you (are using a transparency mask and) want the object not to show through the background color. It fills the non-transparent areas with the mask color. You can see it if you turn the mask fill OFF in default preset, the green background will show through some holes in the image, but when ON, the mask fill color will fill in the holes.
|
|||
| Posted: February 28, 2013 4:06 am | ||||
|
SpaceRay
|
Thanks ThreeDee for explaining it and now I understand it.
Although now I have another mistery that I do not understand, and it is that when changing any of the colors of the layers, it does NOT change the color of the same poligonal design, it completely changes the design of the poligonal fill according to the color you choose , I mean that you get different poligonal fills designs depending on the color you choose on each layer and can´t have the same poligonal fill with different colors. OR perhaps I am doing something wrong or have wrong settings that makes this possible, OR also can it be a problem with the source image, I do not know. I will put an example  |
|||
| Posted: February 28, 2013 6:15 am | ||||
|
SpaceRay
|
For example in the above example shown there is one layer that has the green parts, and if I want to have exactly the same design in blue, is not possible because when you go to color 2 of layer 2 and change the color from green to blue it completely changes the design of that layer

Here below is exactly the same as above and the ONLY change I have done is changing the "color 2" from green to blue and got this shown here that for example the green from hole 4 is changed to hole 3 with another design  |
|||
| Posted: February 28, 2013 6:23 am | ||||
|
SpaceRay
|
And another more visible example, using the same image above, now I replace the Grey "color 3" (that fills a large amount in the image) with green, and suprise, all the grey color from the previous design disappears !!
As said above I do not know if it could be for a bad settings or bad source image or that this is how it works, or whatever. Perhaps I should put an example with the built-in FF images so it could be tested better.  |
|||
| Posted: February 28, 2013 6:40 am | ||||
|
ThreeDee
|
SpaceRay,
That's how the filter works, it looks for areas in the image that are the same color as the layer, so if you change the color, the area changes accordingly. |
|||
| Posted: February 28, 2013 7:22 am | ||||
|
SpaceRay
|
Thanks for the answer, ThreeDee, sorry that I did not know really how it works and I thought that you could choose whatever color and I was wrong in the way I was doing it, so I am sorry it was my fault using it badly.
YES, I have tried now as you have said, and is true that it works really this way and you should sel ect the layers colors according to the original colors of the source image and not try to change those colors in the layers to any other. Sorry for not understanding how it worked. Although it would be really good if FF could let you use the color picker to pick colors from the original sourge image, and so this would be perfect. To pick colors very close to the ones included in the source image I think that the way is to write down on a paper the RGB values of 9 choosen colors fr om the original and then write them inside the settings of the filter in each layer. Here I have put some color stripes done with your new way to do it right Thanks again for the answer and for making this filter  |
|||
| Posted: February 28, 2013 11:29 am | ||||
| Burt |
Awesome filter and useful for shattered effects as well.
|
|||
| Posted: March 7, 2013 12:58 pm | ||||
|
SpaceRay
|
All the above examples I have put are based on loading a source image to the color control setting but this is not the only way you can use this awesome and lovely filter
You can also make simple polygon fill texture with one color and shadows if you want. You just only need to do not load any image into the color control, or if you have already one loaded, you have to unload it selecting the small triangle and choosing unload image You can only have the texture with only ONE color that you may choose and another for background or mask fill Here is one example I have done |
|||
| Posted: July 9, 2013 12:39 pm | ||||
|
SpaceRay
|
You may not want to have a background color for your Poligon Fill texture (the gray background shown above) and you can replace it easily with:
1 - AN IMAGE OR PHOTO 2 - A TRANSPARENT ALPHA BACKGROUND Here in this post I will show the first one, to show how to put an image or photo as background From the example already shown above, you need to uncheck the Mask fill and change the background to transparent color, then after you need to load the image you want as background using the menu File --> Open Image and it will appear there Here is an example |
|||
| Posted: July 9, 2013 12:46 pm | ||||
|
SpaceRay
|
In both above examples you can´t use more than one layer to make the Poligon fill pattern and only one color, BUT there is another possible way to have more than one layer and to have more than one color
2 - A TRANSPARENT ALPHA BACKGROUND You can render your one color pattern (with or without shadow or outlines) with a transparent alpha background, so then after in Photoshop or any other similar software that supports layers you can mix various different ones and the other colors will show through the transparent parts of the previous texture that is on the layer. Following from the example above, instead of loading an image, you must go to File--> New Image and put the resolution you want and select the fill color as transparent in the same way as shown above in the second example with the color picker. |
|||
| Posted: July 9, 2013 12:56 pm | ||||
|
SpaceRay
|
So if you follow my last example in the post above you can do two things:
1 - Render just one and only Polygon fill pattern with one color and then when loading it in photoshop you can duplicate the layer and change the color with Image---> Adjustments --> Replace Color and then after rotate it, or modify it in some way so that it can show in the layer below the foreground pattern. This way you will only have to wait only once for filter forge to render, and you will probably not notice that is the same pattern, as when it is below the other one, you can´t identify it. Here is an example doing it this way shown here with the above result from last post and rotating the result in 3 layers. One tip I discovered, is that if you want a little bit more shadows, you can duplicate again the same layer, and the shadow will increase a little. |
|||
| Posted: July 9, 2013 3:26 pm | ||||
|
SpaceRay
|
The second option for the above is render each color from Filter Forge and also optional you can change the settings for each one of the patterns.
I will not make an example of this one as it would be much the same as the above one here, the only difference is how you do it, and I have seen that using different patterns below the main one, is not important as I could not notice a difference, unless you want to have an specific result. This has been a post done in 5 parts, so if you are just only reading this one, it begins 4 posts above this one, and below the stripes example. |
|||
| Posted: July 9, 2013 3:30 pm | ||||
|
Mike Blackney
|
Great work, ThreeDee!
|
|||
| Posted: February 3, 2014 11:40 pm | ||||
|
Judilynn Art
Posts: 12 |
Hello all. I love what this filter does, but am frustrated as it will not utilize my own image. Regardless how many times I open my image into it, it only processes the sample image for each variation. I've been using FF successfully for four years. What am I missing here? I really want to use this filter on my own images. I'm using version 5.0007 Professional.
Thanks! |
|||
| Posted: December 26, 2015 9:48 am | ||||
CFandM
 |
Are you using FF in stand-alone or as a plug-in?....Are you loading the image via the settings tab..."Source"......Click the little box next to the "Source" to bring up the sub-menu to load an image...
 Stupid things happen to computers for stupid reasons at stupid times! |
|||
| Posted: December 26, 2015 12:37 pm | ||||
|
Judilynn Art
Posts: 12 |
I use Filter Forge as a stand-alone.
I always bring in my images via the File menu. For every filter, "Open Image" or Control-O, opens up the image in the chosen filter and I keep rolling. Why do I have to go into settings and load my image there for this filter? It worked, but that's not the norm. Thanks for your response. |
|||
| Posted: December 28, 2015 6:15 pm | ||||
|
xirja
|
It's sort of been the new standard (since version 3) to do things this way:
https://www.filterforge.com/features/v...mages.html Better work flow imho. OT, Now if we could only get history for more than 10 images: https://www.filterforge.com/forum/read...&TID=12842 _____________________________________________________
http://web.archive.org/web/2021062908...rjadesign/ _____________________________________________________ |
|||
| Posted: December 28, 2015 9:53 pm | ||||
|
SpaceRay
|
As Xirja said, since FF 3 the filter can have two different input ways, and both have advantages and disadvantages, and some times is better to load the images through the settings panel as it happens in this filter and others use the way you described using the file menu There are many reasons to use one or another option to load images, it can be long to explain why. You will be able to know if the filters uses the image load in the settings if you find the little square to load the images in the settings. Also there are some filters (like some of mine) that have the option to CHOOSE wich way you want to use to load the images, because as said both ways give different results, and can have things that are not possible done with one or the other way. |
|||
| Posted: December 29, 2015 4:22 am | ||||
|
Judilynn Art
Posts: 12 |
"Also there are some filters (like some of mine) that have the option to CHOOSE wich way you want to use to load the images, because as said both ways give different results, and can have things that are not possible done with one or the other way."
Aah, I see. There are just some filters that can only accept the image through the filter settings. Gotcha. I've just been lucky that I haven't run across any with that limitation until now. It's a bit of a pain, as I have to import the custom image for every variation of the filter but, well, it is what it is. :> Thanks for the clarification. :> Happy New Year! |
|||
| Posted: December 29, 2015 6:25 am | ||||
|
xirja
|
Simply editing the filter, and replacing the 'Color Control' component with the 'Image' component, and your good to go again.
Polygon Fill (Image Component).ffxml _____________________________________________________
http://web.archive.org/web/2021062908...rjadesign/ _____________________________________________________ |
|||
| Posted: December 29, 2015 5:33 pm | ||||
|
CFandM
|
Loading images through the settings is also quite useful if you want your canvas to be larger then the actual image size...This is very handy if you are not working FF as a plug-in....
Stupid things happen to computers for stupid reasons at stupid times! |
|||
| Posted: December 29, 2015 9:04 pm | ||||
|
LexArt
Posts: 256 |
ThreeDee this is really a very well done, original and creative filter, like it much
Thanks SpaceRay for all the many examples and showing what you have done with this filter, is useful and interesting |
|||
| Posted: December 31, 2015 2:58 pm | ||||
|
SpaceRay
|
I had an idea that I do not know if it would be possible
All the effect here is done with only straight lines, could it be possible to have instead waves or sine waves lines instead ? Do not know really if this could look good or nice |
|||
| Posted: January 2, 2016 11:53 pm | ||||
|
SpaceRay
|
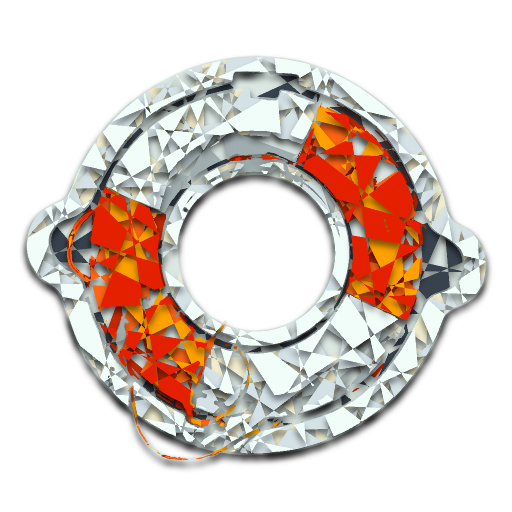
I have just found this image and then remembered this filter that makes lovely and awesome images with lines and triangles with shadow
Want to thanks really very much to ThreeDee for making this filter and I miss you much  |
|||
| Posted: June 8, 2020 10:56 pm | ||||
Join Our Community!
Filter Forge has a thriving, vibrant, knowledgeable user community. Feel free to join us and have fun!
33,825 Registered Users
+12 new in 30 days!
153,741 Posts
+13 new in 30 days!
15,384 Topics
+5 new in 30 days!
Online Users Last minute:
11 unregistered users.
Recent Forum Posts:
- Ancient Free Packs!! by Shayne
yesterday - Double Mosaic by Ramlyn by Ramlyn
July 9, 2026 - New awesome TEXT component FF 14 - How to get the most of it? by CFandM
July 8, 2026 - Variable Kaleidoscope by inujima by SpaceRay
July 6, 2026 - Question about Upgrading to newest version by GMM
July 6, 2026 - Guide on how to use texture maps PBR export with Filter Forge for 3D by SpaceRay
June 24, 2026 - PBR work flow...? by SpaceRay
June 24, 2026 - Chaos Fields by Ramlyn
June 21, 2026 - Unleashing creativity art with the help of filter forge 11 by EAdams
June 14, 2026 - FF 11 and FF 12 Studio animations that could maybe be done I think by CFandM
June 8, 2026 - BB - BubbleBlocks by Ramlyn by Ramlyn
June 2, 2026 - Dragon Distort II by Wolfgang Halder by Wolfgang Halder
June 1, 2026