|
SpaceRay
|
||||||
| Posted: August 28, 2013 4:52 am | ||||||
|
SpaceRay
|
I have finally arranged this filter to be able to submit it to the library
First of all I must give a very big thanks to: ThreeDee and his excellent letters from TD Europa Sans Caps Proc Font and also Skybase and his wonderful and lovely Gradient Circles filter I had already had this idea since Filter Forge 2.0, but there is no Text support inside FF, so ThreeDee has been a huge great help making this font to be able to use letters inside FF and use them as shapes. Thanks to his idea, skills, patience and hard work has been able to include a font inside Filter Forge and give the oportunity to make filters like this that was impossible before. I will also make another version of this filter with the other excellent and even more professional fonts that also ThreeDee have done Arial TD Font Snippet |
|||||
| Posted: August 28, 2013 5:14 am | ||||||
|
SpaceRay
|
This filter will use 5 letters that you choose and then mix them according to the settings you put.
I have made this filter for converting images into typograhic artistic creations and be able also to make typographic textures. To see more how it works, you can see the presets and the setting it has You can use just only one image, or you can combine 2 or even 3 different images (2 color controls and the main one). For 1 image For only 1 image, put same image in both color controls, as shown in the default preset 1 For 2 images you have two options: 1 - Two images using both color controls: Put a different image in each color control 2 - Two Images using both color controls with the same image and using the main image loaded and activate Alpha Background checkbox. For this to work the foreground texture can´t be too much complex and must let the background show. For 3 images Put a different image in each color control and load a main image and activate Alpha Background checkbox. For this to work the foreground texture can´t be too much complex and must let the background show. Main image loaded The only possible way that the main image is shown is to activate the main one you have to use the Alpha background checkbox and will show through remaining space, for example preset 7. As it happens with all the filters if you load the main image, it will also take the resolution of that image for the final result. If you do not want to have any main image, just go to New... and sel ect the resolution you want. Experiment with many different combinations This filter gives a lot of possible different combinations that will give many different results and I invite you to test many different settings and experiment with different image, photo, and plain color sources, and using 1, 2 or 3 images together in different ways and combination. Also try to swap images fr om Tint Color to Background and see what happens, because the result can be very different. Next Variant button I have tried to use the "next variant" button and have optimized in some way the filter so you can get some usable results, I was going to add some hue and light controls, and also to be able to use blend modes, but this would be bad for this next variant option. |
|||||
| Posted: August 28, 2013 5:37 am | ||||||
|
SpaceRay
|
Will put some examples made with this filter later.
|
|||||
| Posted: August 28, 2013 5:55 am | ||||||
Skybase
 |
Looks like you're missing a couple components from the original version by ThreeDee. Doesn't honestly look like a major problem when abstracted. But you know... just for kicks.
 |
|||||
| Posted: August 28, 2013 5:58 am | ||||||
|
SpaceRay
|
OH! It can be possible as I did a mess when removing some components that was not needed for this filter and could have deleted some components that was really needed but I did not notice. Please can you tell wh ere exactly should this missing components should be in my filter? I have had also some problems making it work, as there was something wrong with the letters, and maybe this is the reason I had this problems. |
|||||
| Posted: August 28, 2013 6:12 am | ||||||
|
SpaceRay
|
There is something I have missed and is important
I have put above
Well the right text is
______________________________ Thanks Skybase I have found the error that you mean and what is weird is that it has NOT been an error from me, THIS happens when you COPY the components from one filter to another  
Comparing filters I have seen that the problem is when copying the Profile Gradient that gets distorted and so the lookup and others get also wrong I will fix it and upload again, thanks for letting me know _____________________________________________ |
|||||
| Posted: August 28, 2013 11:02 am | ||||||
|
SpaceRay
|
Here are some examples I have made
|
|||||
| Posted: August 28, 2013 11:21 am | ||||||
|
SpaceRay
|
A beautifully complex artistic typographic texture made with a colorful texture and this filter will pick up the different colors and assign each letter a random different color.
|
|||||
| Posted: August 28, 2013 11:23 am | ||||||
|
SpaceRay
|
And the one above is too small to see really the details so here I have made a bigger version, so you can see it better
|
|||||
| Posted: August 28, 2013 11:25 am | ||||||
|
SpaceRay
|
Sorry this one above here is not using a colorful texture is using a colorful stripes texture as tint color, that is the same I have used in the examples below, the great difference is that in this one I have used the background of the color control in white and also the main image is white.
Here is again the same image of above but even bigger to see it even better the letters mix |
|||||
| Posted: August 28, 2013 11:28 am | ||||||
|
SpaceRay
|
Here I have loaded in both color controls and in the main image this colorful stripes image and then modified the settings so it breaks the inside of the stripes.
This is the same one also that has been used in the above example (the 3 images above) |
|||||
| Posted: August 28, 2013 11:31 am | ||||||
|
SpaceRay
|
Here is exactly the same image as above here, BUT I have just unloaded the Background image (the same stripes) and made it plain white
As you can see modifying ONLY the Background image from full color image to plain white can give a really very different result |
|||||
| Posted: August 28, 2013 11:34 am | ||||||
|
SpaceRay
|
And making it even more complex
|
|||||
| Posted: August 28, 2013 11:38 am | ||||||
|
SpaceRay
|
Here I have used a very hot burning coals texture photo to convert them into a typographic texture from hell
|
|||||
| Posted: August 28, 2013 11:45 am | ||||||
|
SpaceRay
|
Here is a bigger version of the above to see better the details and showing also part of the original source photo of the hot coals burning
|
|||||
| Posted: August 28, 2013 11:47 am | ||||||
|
SpaceRay
|
And here is using preset 6 (modified to be a little bigger scale) from a red and yellow tulip over plain white background.
As you can see this filter can convert a plain pure white background into some beautiful typographic texture. |
|||||
| Posted: August 28, 2013 11:54 am | ||||||
|
SpaceRay
|
And what about using an aerial view of Hong Kong Harbour taken from Peak Tower place?
This is done using preset 6 and then reducing even more the size slider until you consider is enough, it depends on the resolution and details of the original photo. Also the photo is loaded as main source and loaded also in both color control for tint color and background |
|||||
| Posted: August 28, 2013 12:02 pm | ||||||
|
SpaceRay
|
Here is bigger size of the above to see better the beautiful texture that is made
|
|||||
| Posted: August 28, 2013 12:06 pm | ||||||
|
SpaceRay
|
Please download the update of this filter
There has been an error in all the presets than when you unload the image of the color control, it was dark blue and should have been white as default, so I have updated all the unload values of each preset. Updated text info too ___________________________________ Also I am making an ADVANCED version with many more controls and that gives much more possible customization and gives other many possible combinations that are not possible in this version, for example have letters in different sizes, rotate them, move them, have opacity, have adjustments controls, and more things added. I have NOT added all these options to this version for two reasons: 1 - If I add all these controls, then the "next variant" nearly becomes unusable and is much more difficult to get good and useful results. 2 - I want to keep a simple version, so it is not a complex thing to work with and is plain and simple. |
|||||
| Posted: August 30, 2013 4:00 pm | ||||||
|
Skybase
|
1 - If I add all these controls, then the "next variant" nearly becomes unusable and is much more difficult to get good and useful results.
You need to design your controls for that, which if you do, I'd give you extra points for that. Remember, use remaps, simple blend modes, and others to restrict control, while providing the needed content. Restrictions will help to ensure predictable varieties! So I'd encourage that than not having it. I mean, "advanced" doesn't mean "more control" either. It just means "more control on places where understandable". Getting specific with what you do helps to establish a confident output. Point being you're designing the outcome rather than letting it all loose with more controllers and nodes and stuff. So in any case I'd encourage engaging in design efforts of that nature. I'm pretty sure you'd accomplish the task, plus create a cooler filter, and also really help to push some of the bounds of what the program can do with a couple clicks. Having the filter work with the next variant button sounds like a challenge, but it isn't. It's just hard work. Fortunately, ThreeDee constructed the filter so it really works! You really don't get bad results, unless you seriously hate somethings it does. |
|||||
| Posted: August 30, 2013 10:44 pm | ||||||
|
SpaceRay
|
YES, absolutely true, and you are right that is not a good word, and I have thought that will be much better to put Alphabet Texture Creator Extended Thanks for your comments and the tips and will do it as you say and care more about the setting and optimize it more for "next variant" button randomization |
|||||
| Posted: September 2, 2013 4:12 am | ||||||
|
SpaceRay
|
I forgot to test this with images with transparent background and I have seen that it does not work although, only works with the foreground image that you can load in the color control.
Here below, shows that any transparent background will become white texture |
|||||
| Posted: September 3, 2013 1:49 pm | ||||||
|
SpaceRay
|
I am making a new version that will allow using real and true transparent background as masks, but is more complex than just adding the "get-alpha set alpha" components and I need to duplicate and modify the inner workings of the filter for it to work right. I want to thanks to CFandM that has given me the needed information to be able to make this modification as can be seen in this thread
In the next update I will change the Tint Color from being a color control to load the main external image instead so you can use much better the presets included. USING EXTERNAL DESIGNED FRAMES I have the idea also to test this filter with external images that are color frames, rectangular or circular. Although in this one is using a full image as you still can´t have mask to make a frame with transparent or solid color inside, will be available soon. Here I have loaded only the image in Tint Color using Preset 8 without any change |
|||||
| Posted: September 6, 2013 2:38 pm | ||||||
|
SpaceRay
|
And here is the same one as above but using the same image for both, tint color and background using Preset 8 without any change
Note: In next version update I will change the "background" name for "foreground" as really that and not a background. |
|||||
| Posted: September 6, 2013 2:41 pm | ||||||
|
SpaceRay
|
Here I am using the "background" (that will be called "Foregorund" in next update because of this) to show a overlay photo of an old compass over the typographic texture.
|
|||||
| Posted: September 10, 2013 2:58 am | ||||||
|
SpaceRay
|
Also this filter in the "Tint Color" control takes mainly the source colors for changing the letters colors, so you can use any combination you may have of colors with images or photos, hue ranges, or other possible color sources.
Here I have used a red and white peeling paint photo I have using preset 1 In next update the "Tint color" will be changed to appear as MAIN image instead of a color control, so it will be better and easier to use and you can then really use the presets as now you can´t do it because of this. |
|||||
| Posted: September 10, 2013 3:42 am | ||||||
Kevin Worth
 |
Nice effect SpaceRay
|
|||||
| Posted: September 10, 2013 3:44 pm | ||||||
|
SpaceRay
|
Glad you like it and thanks for your comment. |
|||||
| Posted: September 12, 2013 4:35 am | ||||||
|
SpaceRay
|
Here is another example I have done with a photo from a Oil Refinery, and when using it with this filter gives really a totally new different result
|
|||||
| Posted: September 19, 2013 4:20 am | ||||||
|
SpaceRay
|
Here is something that I have seen that if want to have isolated designs not filling the whole canvas, there is a way to make it using a black background as a mask to fill all the parts that you do not want letters inside.
For example I have this speakers sphere and when using it when my filter it will only render the effect over the sphere source colors and not over the black so you will get a spherical design. This one here and the above one has been done with preset 1 |
|||||
| Posted: September 19, 2013 6:59 am | ||||||
|
SpaceRay
|
Here I have put the photo in the center vertical and leave all the sides black using preset 4
|
|||||
| Posted: September 19, 2013 1:05 pm | ||||||
Erik Pedersen

Posts: 291 |
The creative possibilities are endless and the uniqueness is invaluable! Thanks for all your hard work on this, SpaceRay! I know I'll be spending quite a lot of time creating fascinating art with it! Filters like this are why I use Filter Forge so much!!!
(As you can tell by all the exclamation points, I am VERY excited about using this filter!!! <lol>) The Joy is in The Work |
|||||
| Posted: September 19, 2013 1:07 pm | ||||||
|
SpaceRay
|
Thanks very much for your comment and I am glad and happy that you like it much and is useful and helpful for you and that willbe good for making art with it I agree also that filters like this is why is worth to have filter forge If you like this version wait until the extended version |
|||||
| Posted: September 19, 2013 1:08 pm | ||||||
|
SpaceRay
|
Please before reading this, see my 3 above posts showing some new examples so you can understand better this text
UPD ATE WARNING IS TRUE? When you are going to upd ate the filter it puts the following message
Well, I have to say that this is NOT TRUE, at least in my case, because I have already 10 user presets and none of them has been modified or changed, and are the same as it was before. NEW IMPORTANT UPDATE Now is available the new updated version with some important changes: 1 - Now can you can use either main image OR use the "Tint Color" setting 2 - Be able to sabe your presets with your own images saved on the preset 3 - I have optimized the presets and have made some new ones to show better what can be done. 4 - Changed the name of Background to Foreground 5 - Changed the name of "Invert A to E" to "Letter Shape A to E" 6 - Modified the text in the About text, so please, read it again. DETAILED EXPLANATION OF EACH ONE 1 - Now can you can use either main image OR use the "Tint Color" setting 1 - Before you could not use the presets as you wanted, because each time you used a preset it would delete any previous image you may have and put the image stored in the preset. So now I have added the ability to choose to use main source images loaded through the main image menu or use the "Tint Color" setting. This makes a very important change and modifies in a very good way the usability of the filter, because before with only the Tint Color, you could NOT be able to use the presets as any image you loaded would be replaced by the image loaded in the preset. Now thanks to the new use of the main image, you can load any image you would like AND then choose ANY of the presets and they will all work over your choosen image and show the result with the preset se ttings overriding any preset image saved. Now by default the main image load is activated, because if I put as before by default the Tint Color, it would not work, because this is the way FF works. Deactivating the main image will ONLY use the Tint Color as source color, BUT will remain using the main image for the size and resolution of the canvas. Be aware that if use the checkbox activating the main image, the "Tint color" will be deactivated and not work. 2 - Be able to save your presets with your own images saved on the preset I did not replace the "Tint color" se tting directly with the "Main image" because if you want to save any preset with your OWN custom images, it will not be posible if you use the main image loaded SAVING PRESETS FULLY INCLUDING THE SOURCE IMAGE ONLY POSSIBLE WITH TINT COLOR If you are using the main image you will NOT be able to save the full preset with the source image included, it will keep the built-in image instead, so to be able to save the full real image including the source image, you must use the "Tint Color" control to load the image and then save the preset. 3 - I have optimized the presets and have made some new ones to show better what can be done. The presets before had some slighty problems, and were not optimized well, now I have redesigned many of them, and made them better and even added some news ones to show more options and ways to use the filter. Also to see that working with dark colors will make dark colors as a kind of mask style , (for this please, see the above post with black background) 4 - Changed the name of Background to Foreground This control se tting is really foreground because is always OVER the main image or the Tint Color source, and is not at all a background. 5 - Changed the name of "Invert A to E" to "Letter Shape A to E" This means that if it is active and checked will show the full and real letter shape as you know it, when you uncheck it, it will be inverted, and then the letter shape will be transparent and the outher part will be filled with white. Also be aware that using this invert the letter will now probably have a square shape I have added this options because you can get some interesting and unusual effects also without using the ful letter shape and getting the inverted one. |
|||||
| Posted: September 21, 2013 6:59 am | ||||||
lipebianc
 |
EXCELLENT WORK, SpaceRay!
Your coolest filter so far (IMHO) Keep up the great work!  "From the moment we are born, we start being filtered..." |
|||||
| Posted: September 24, 2013 9:53 am | ||||||
|
SpaceRay
|
WOW!! very beatiful work you have done and great idea to use that background as a frame, well done. Thanks very much for your comment and glad that you like it, and specially coming from you. If you like this filter wait until you can see the extended version with many more controls and more features available.
Thanks, comments like yours and showing what you have done, makes me feel more motivated to make more works and make better ones. |
|||||
| Posted: September 24, 2013 10:17 am | ||||||
|
SpaceRay
|
I have just updated the filter fixing a possible problem I have discovered that you could not get always the same result when having External image OR color control, and it could be much different as shown here below

For more information and full explanation abut this please see this other thread Why using External image OR Color control gives different results? By default is used the main external image, and there is no problem with this, but if you loaded the same image through external and color control, and you want to have the same result with the color control as the one already given by the External image, it could be a problem SOLVED POSSIBLE PROBLEM WHEN USING COLOR CONTROL So, to solve this I have changed on all the presets inside the color control, the Placement tiling value setting from "Tiling None" to "Tiling Mirror" as default, because this solves the problem. If you find any problem with this you can change again the placement tiling to "Repeat" or to "None" |
|||||
| Posted: September 25, 2013 3:25 pm | ||||||
|
SpaceRay
|
Here are some examples using only colorful stripes as source colors
|
|||||
| Posted: October 4, 2013 8:54 am | ||||||
|
SpaceRay
|
Smaller size letters
|
|||||
| Posted: October 4, 2013 8:56 am | ||||||
|
SpaceRay
|
Bigger size letters and with corner roundness at zero value
|
|||||
| Posted: October 4, 2013 8:58 am | ||||||
|
SpaceRay
|
And using a painted abstract colors
|
|||||
| Posted: October 4, 2013 9:00 am | ||||||
|
SpaceRay
|
Also apart from the 4 new examples shown above, there is also available already the extended version of this filter, with many more controls and customization and having masking with transparency and other new features
And additionally I have done it with full and complete instructions, hints and tips on how to use it in the best way and how to get the most of it Alphabet Texture Creator Extended by SpaceRay |
|||||
| Posted: October 4, 2013 9:24 am | ||||||
|
SpaceRay
|
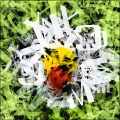
None of the above examples are using the Foreground input, so here I have made another design using a Texture with grey, white and red loaded as main image to tint the typographic texture, and then loaded the red flower with transparent background as "Foreground color"
This could be used to put photos over the texture, or also you can do it with more control using Photoshop (or similar software) in layers and using blending modes Or have the image fully without the texture showing through the foreground image |
|||||
| Posted: October 12, 2013 11:46 am | ||||||
Join Our Community!
Filter Forge has a thriving, vibrant, knowledgeable user community. Feel free to join us and have fun!
33,816 Registered Users
+15 new in 30 days!
153,728 Posts
+24 new in 30 days!
15,379 Topics
+5 new in 30 days!
Online Users Last minute:
7 unregistered users.
Recent Forum Posts:
- Chaos Fields by Rachel Duim
June 14, 2026 - Unleashing creativity art with the help of filter forge 11 by EAdams
June 14, 2026 - FF 11 and FF 12 Studio animations that could maybe be done I think by CFandM
June 8, 2026 - BB - BubbleBlocks by Ramlyn by Ramlyn
June 2, 2026 - Dragon Distort II by Wolfgang Halder by Wolfgang Halder
June 1, 2026 - Multi Refraction by aaron Harris by SpaceRay
June 1, 2026 - Flashing Messages 3x6 by Rachel Duim by SpaceRay
May 28, 2026 - New awesome TEXT component FF 14 - How to get the most of it? by SpaceRay
May 28, 2026 - Just dropping in to say by Rachel Duim
May 24, 2026 - Veggie Rock by Vanblam by dactilardesign
May 22, 2026 - Snippet - A refinement for terrain and world generating filters by David Roberson
May 17, 2026 - FilterForge as an Art Tool by Rod Detmer
May 7, 2026