|
SpaceRay
|
||||||
| Posted: March 14, 2014 12:56 pm | ||||||
|
SpaceRay
|
I liked it much and was good when I have seen the examples you have shown in this other thread here and was waiting and expecting to use this filter, but when downloading it, regretably I am sorry to say that from the tests I have done, it does not work always well in the same way with the images, what is seen with the FF Lifesaver, the results with other images are different, maybe is because I am using it wrong and have choosen the wrong images to make the tests, so I will see what I can do
This is Preset 3 
And this is the same preset 3 with the FF Ladybug  |
|||||
| Posted: March 14, 2014 1:01 pm | ||||||
|
SpaceRay
|
And here is another example using the preset 3 and only changing the 2 color controls to White
This one looks better, at least in the center part Sorry to tell something negative, and as said is maybe that I am using it wrong as it has many settings available and could be my own fault using it badly, as I wanted to say something good about this nice filter idea  |
|||||
| Posted: March 14, 2014 1:20 pm | ||||||
|
SpaceRay
|
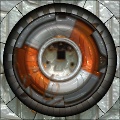
Well, I have thought that if the presets looks very good and nice with the FF Lifesaver, I should test a similar circular image and here I have used an old compass and as I expected, in this case it works the filter much better and gives a good expected result
using preset 10  |
|||||
| Posted: March 14, 2014 1:31 pm | ||||||
|
SpaceRay
|
And I was right thinking that with a circular source image it will look good and it gives a good effect as seen here below, and here the filter cuts very well the border of the compass in parts when using preset 6
This is using Antialias 5 samples, and maybe to get a better looking result the antialias should be raised to get better lines edges  |
|||||
| Posted: March 14, 2014 1:42 pm | ||||||
Ramlyn
 |
Hi SpaceRay.
The filter surely works better with circular images, because it is split in circular areas. I agree with you that it doesn't fit with some images. I'm not sure if I should change something in the structure of the filter or if the presets are too specific. I mainly made the presets using the lifesaver, so I should probably try to do something different. I would like to add also some explanation about how the various parts of the filter are connected, because I guess it may not be simple to use. Anyway I think I will do an update in short time. |
|||||
| Posted: March 14, 2014 4:47 pm | ||||||
|
Ramlyn
|
Preview :
This is an experimental stage of..... The Infernal Machine. 
It is not much different from Multisector splitter 3, as idea, but it adds several different patterns for the sectors and it gives the chance to choose between circular and polygonal areas. It still needs a lot of work and tests. ( The name is not for the look, but for the complexity of the filter. When it will be ready, I may add the words "Use at your own risk". |
|||||
| Posted: March 14, 2014 5:13 pm | ||||||
|
SpaceRay
|
Well I do not know as I do not know what you want to get with the filter, and maybe you should try to use other built-in images to see what the effects can be done and not only with the FF lifesaver
This would be good to understand and use it better and be able to get the most out of the filter, as it has many settings, but is not very clear what they do. |
|||||
| Posted: March 15, 2014 3:25 am | ||||||
|
Ramlyn
|
I have just finished to upload an update. It should be available soon.
Below I write a short introduction to the filter. This same introduction can be downloaded as Word file at the following link : Introduction to Multisector Splitter 3 |
|||||
| Posted: March 17, 2014 8:17 pm | ||||||
|
Ramlyn
|
Introduction to Multisector Splitter 3
Multisector Splitter 3 splits pictures in circles and sectors. Thanks to its many settings, it allows to customize the way of splitting, adding shadows, blurs, deformations. The filter system is divided in 5 circles. Every circle can be independently customized through controls. In the filter, the controls are named by their function and followed by the number of the circle ( example : “Zoom 1†, “Slices 3†). This is a brief explanation of each control. As support to this explanation, we use the filter presets fr om 11 to 19. The preset 11 is a neutral preset, where no blurs, deformations or other effects are applied. It can be used as comparison with the presets 12-19, where particular effects are applied. - ZOOM : The zoom just zoom in the center of your picture, See the preset 12 : it is the same as the preset 11 with only the zoom changed in all circles to 15, 25, 50, 75, 100. - BLUR ZOOMED : - BLUR ORIGINAL : they have the function to blur "the design overimposed on the picture" or "the original picture". They are useful to create contrast, with the blurred one appearing flat and the normal one apperaring slightly rough, like if they were two different materials. See the preset 13 with all five BLUR ZOOMED set to 50 and the SLICED set to 7, 14, 21, 28, 35 - SLICES : - SWIRL : - ROTATION : - DISTORTION : They ara used to split in areas and redesign every single circle. The neutral positions are SLICES 0, SWIRL 50, ROTATION 0, DISTORTION 0. SLICES sets the number of slices of every circle ( see the preset 14 with the circles set to 5, 10, 15, 20, 25 SLICES ). SWIRL gives a spiral shape to the slices. Depending if the value is 0-49 or 51-100, the spiral will turn on different ways. See the preset 15 for all circles set to 7 SLICES and SWIRL to 0, 25, 50, 75, 100. ROTATION sets the rotation of the slices. See the preset 16 for the five circles design rotated of 10, 15, 20, 25, 30 points. DISTORTION creates a distortion in the shape of the slices. This is better viewable with a number of slices higher than 5. See the preset 17 for SLICES 15 and DISTORTION set to 20, 40, 60, 80, 100 in the five circles. - LINES OPACITY : It sets the opacity of the lines that defines the slices. When the opacity is set to 0, the slices have no black border. - RADIUS : - BLUR : They are the settings of every single circle. RADIUS sets the radius of the circle. Because the circles are set in order down-up from the center to outside, it is possible to make disappear one of the circles simply changing its radius to bring it under the upper circle, as you can see in the preset 18, wh ere the second circle is set to RADIUS 85, making it disappear under the third circle. BLUR simply applies a blur/smooth effect the whole circle starting from its outside border ( in the preset 18, the first circle has been blurred ). - PIC ROTATION : It rotates the picture in the circle. The preset 19 has the circles rotated of 20, 30, 40, 50, 60. - BLACK RADIUS : - BLACK BLUR : The basic position of the BLACK RADIUS is 0.50 points smaller than the RADIUS of the upper circle ( example : the basic filter has the BLACK RADIUS of the center circle set to 59.50 and the RADIUS of the second circle set to 60. The BLACK RADIUS defines the radius of the black border around every circle. Higher is the BLACK RADIUS value and smaller is the black border. Lower is the BLACK RADIUS value and bigger is the black border. The BLACK BLUR creates a black shadow around the circle. It is useful to give more round and solid shape to every circle. It can also be used to darken some circle. - LINES COLOR : It is the color of the lines of the design of every circle. - CIRCLES BACKGROUND : It is the color of the BLACK RADIUS and BLACK BLUR. - FINAL CIRCLE RESIZE : It increases the size of the BLACK RADIUS and the BLACK BLUR of the circle 4 and the RADIUS of the circle 5. It is useful to expand the radius of the final circle also outside of the borders of the picture. |
|||||
| Posted: March 17, 2014 8:18 pm | ||||||
|
SpaceRay
|
Thanks very much for exlaining in detail how it works and how to use the settings, will test it when I have some time
|
|||||
| Posted: March 22, 2014 2:51 am | ||||||
DJI
 |
Man you are just way too much. This filter is amazing I really like it. It's going to take me forever to learn how use it but this ones worth it.
"Art is quite useless." Oscar Wilde |
|||||
| Posted: July 15, 2014 8:54 am | ||||||
|
Ramlyn
|
Ha! Ha! Thanks DJI. It is a complex filter, not easy to use. I made many filters splitting the image in circles and sectors. This is someway a medium-complex one. I may upload some others (they are simple filters, not surface ones. The surface ones are far away more complex than this and too hard to learn ) in the next days.
|
|||||
| Posted: July 15, 2014 9:51 am | ||||||
|
Ramlyn
|
High Usage Rank! Thanks to everybody for using this filter!
|
|||||
| Posted: November 30, 2014 4:27 am | ||||||
Knight81

Posts: 12 |
Very good filter.
I'm working on a picture and would like to have the "slices" inside the image border. But if I change the image drawing area, it becomes not what I want. (See those red marked parts of the picture). Is it possible to zoom the whole image, without changing it and get the parts inside the image's border?  The-any-Key |
|||||
| Posted: January 11, 2015 3:54 am | ||||||
|
Ramlyn
|
Hi Knight81. Thank you for your comment.
So... you want the colored areas inside the border... I don't know your original picture ( the result you get depends also on the original picture ), so I can't test in my FF. Anyway I think those areas should be modified with the number 4 controls. In particular, reducing the value of Zoom 4, you should succeed to make them disappear without having to modify anything else. ( The slices are of two kind, zoomed and not zoomed. I believe that the surround of your picture is white, so the non zoomed slices are white, and the center of the picture is green-yellow-blue, so the color is zoomed out if the Zoom 4 is higher than 0 ) I don't know if this is a good answer to your question. |
|||||
| Posted: January 12, 2015 5:15 am | ||||||
|
Knight81
Posts: 12 |
Hi.
Here is the original picture. I tried using the zoom 4. They comes within the border But they disappear. But I would like to have them as is. (Will try if I can zoom down all and get them within the image frame.)  The-any-Key |
|||||
| Posted: January 22, 2015 12:15 am | ||||||
|
Ramlyn
|
OK, got it. I must change the filter a bit to get that effect.
I can make a new version for you and post it here later. |
|||||
| Posted: January 22, 2015 3:37 am | ||||||
|
Knight81
Posts: 12 |
Endless thank you.
The-any-Key |
|||||
| Posted: January 23, 2015 1:16 am | ||||||
|
Ramlyn
|
This is the file : Multisector Splitter 3 - Grab Disc
These are the changes : 1. The filter still has a basic image as before but, the source for the Blur zoomed and the Blur original have two new controls allowing to choose an image or a color. Every circle has its own 2 controls ( "Image zoomed" and "Image original" ). Choosing a color in one of these two controls, it is possible to make it semi-transparent obtaining as result a colored image ( the basic image + a color ). 2. I added the Disc controls. They allow to create a reduced versions of the circles. This is how they work : Let's take as example the inner circle, 1. The Disc 2 firstly generates a copy of the circle 2, with a empty space in the center. The outside and inside size of this Disc can be changed independently from the circle 2. It then resize the Disc to fit the size of the circle 1. The obtained Disc can be blended with the circle 1. Because the controls are independent, it is possible to delete the circle 2 and still keep the Disc 2. Try this new version and let me know if it may fit. |
|||||
| Posted: January 24, 2015 3:34 am | ||||||
|
Ramlyn
|
Today I post a third version with only one ring and some more customization options.
|
|||||
| Posted: January 24, 2015 10:56 pm | ||||||
|
Ramlyn
|
Here is a revised version of the previous Multisector Splitter 3 - Grab Disc.ffxml
And here is the new one : Multisector Splitter 3 - The Ring.ffxml |
|||||
| Posted: January 25, 2015 4:52 am | ||||||
|
Ramlyn
|
The differences are :
The first filter has 4 discs/rings. Each disc is connected ( same design and style ) with one of the circles from 2 to 5, and it is used to appear over the circles from 1 to 4 ( the disc 2 appears on the circle 1, the disc 3 appears on the circle 2, etc ). The second filter has only one ring, controlled with the commands starting with R. The ring has its own design and size. The bevel of this ring can be set both on the inside and outside. The slices can be set to transparent or colored, so that only some of them appear. The way ( mode ) the various parts blend together can be selected. It is an interesting variation, I think. |
|||||
| Posted: January 25, 2015 5:02 am | ||||||
|
Knight81
Posts: 12 |
Tried to use your new filters, but it was not quite what I wanted. I tried to change a little myself on the original filter and got the result I wanted. (sorry for the inconvenience)
Added Zoom relative. (zooms all the rings with one value)  The-any-Key |
|||||
| Posted: January 26, 2015 12:58 am | ||||||
|
Knight81
Posts: 12 |
||||||
| Posted: January 26, 2015 12:59 am | ||||||
Join Our Community!
Filter Forge has a thriving, vibrant, knowledgeable user community. Feel free to join us and have fun!
33,825 Registered Users
+12 new in 30 days!
153,741 Posts
+13 new in 30 days!
15,384 Topics
+5 new in 30 days!
Online Users Last 5 minutes:
26 unregistered users.
Recent Forum Posts:
- Ancient Free Packs!! by Shayne
2 days ago - Double Mosaic by Ramlyn by Ramlyn
July 9, 2026 - New awesome TEXT component FF 14 - How to get the most of it? by CFandM
July 8, 2026 - Variable Kaleidoscope by inujima by SpaceRay
July 6, 2026 - Question about Upgrading to newest version by GMM
July 6, 2026 - Guide on how to use texture maps PBR export with Filter Forge for 3D by SpaceRay
June 24, 2026 - PBR work flow...? by SpaceRay
June 24, 2026 - Chaos Fields by Ramlyn
June 21, 2026 - Unleashing creativity art with the help of filter forge 11 by EAdams
June 14, 2026 - FF 11 and FF 12 Studio animations that could maybe be done I think by CFandM
June 8, 2026 - BB - BubbleBlocks by Ramlyn by Ramlyn
June 2, 2026 - Dragon Distort II by Wolfgang Halder by Wolfgang Halder
June 1, 2026