The Anti-Aliasing menu (Filter > Anti-Aliasing > ...) controls the level of anti-aliasing applied to an image during the rendering. Anti-aliasing is a technique that improves the image quality by reducing the edge pixelation effect that may appear in filters whose output includes hard edges, lines or shapes:

For rendering, Filter Forge uses the procedural approach – it builds an image function based on the filter component tree and evaluates it for every pixel of the resulting image. When anti-aliasing is turned on, a single pixel is rendered using multiple evaluations – or 'samples' – of the image function. The results of these samples are averaged to produce the anti-aliased pixel. In Filter Forge, there are 7 levels of anti-aliasing ranging from 5 to 65 samples per pixel:
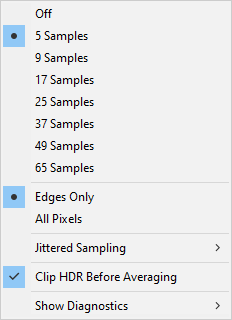
Off – no anti-aliasing is performed, the image is rendered with one sample per pixel.
5 Samples – 65 Samples – these options define the number of samples used to evaluate each anti-aliased pixel of the image. The higher the number of samples, the better the result. However, higher number of samples slows down the rendering – for example, 16 samples per pixel make the rendering of that pixel 16 times longer than the rendering with 1 sample per pixel. The recommended setting is 5 to 9 samples. For filters that output hard edges, geometric patterns, or highly detailed reflective surfaces, the recommended setting is 17 to 25 samples.
Edges Only – activates the smart anti-aliasing algorithm. In this case, anti-aliasing is applied only to pixels that are located near the hard edges, and, for Surface filters (those that use Lighting), in high-frequency areas of the height map. In the majority of filters, such areas usually occupy a small percentage of the entire image area, so turning the Edges Only option on can significantly speed up the rendering without a visible loss in the image quality.
All Pixels – when this option is selected, anti-aliasing is applied to all pixels of the image, the smart anti-aliasing algorithm is not used. Turning this option on can significantly slow down the rendering, while the quality improvement is usually marginal.
Jittered Sampling – Normally, Filter Forge uses a regular grid pattern for placing samples within a pixel which is being anti-aliased. For filters that output high-frequency geometric patterns, the grid-based sampling may result in undesirable artifacts such as bands or moire-like patterns. This effect can be reduced by using jittered sampling which randomizes the sample positions within an anti-aliased pixel – this breaks the unwanted patterns by replacing them with noise though it can slow down the rendering. Jittered sampling affects anti-aliased pixels only and has no effect when anti-aliasing is turned off. When this option is set to Off, samples within a pixel are always taken at the same positions on a regular grid. When set to any other value, a random offset is applied to the sample positions – the higher the value, the more chaos is introduced. This setting is stored in filter presets and is applied on a per-preset basis.
Clip HDR Before Averaging – when turned on, clips the RGB channels of the samples into the range of 0...1 before the samples are averaged to produce an anti-aliased pixel. This is helpful for fixing a common problem that arises from the use of HDR colors – when sample colors are too bright, averaging produces suboptimal anti-aliasing. Turning this option on lets you clip the RGB channels of the samples before they are averaged, which leads to smoother anti-aliased edges. This option is turned off by default, so you should manually turn it on to get better results with non-HDR images.
Show Diagnostics > Off – turns the anti-aliasing diagnostic off, which means the normal rendering result is displayed.
Show Diagnostics > AA Zones – shows the so-called Anti-Aliasing Zones, that is, solid-colored or smooth areas in filter's output that do not need anti-aliasing in their interior but need anti-aliasing on their edges (where they meet another zone). All Filter Forge components report their AA zones to the renderer, which combines zones from all components into the final AA Zone and runs an edge-finding algorithm on it to see which pixels should be anti-aliased. For more information about AA Zones, see Implementing Smart Anti-Aliasing.
Show Diagnostics > AA Edges – shows which pixels in the filter's or component's output will be anti-aliased (denoted with white.) This is basically a result of an edge-finding pass over the AA Zones map.