The Configure Channels dialog allows you to customize the list of channels available for rendering on the current tab. The list of channels is specific to each tab: enabling and disabling channels for a tab won't affect channels in other tabs. The dialog is accessible by selecting Filter > Render Channels > Configure Channels from the Main Window menu or via the ![]() button next to the channel selector.
button next to the channel selector.
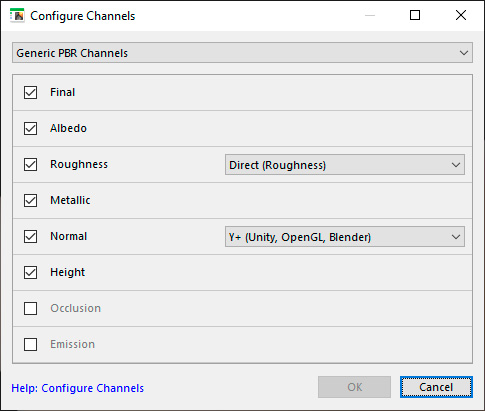
Availability of specific channels in the dialog depends on the filter type – Simple, Legacy Surface or PBR Surface. The Final channel is always available and cannot be disabled.
Channels that are enabled in this dialog become available for rendering and are selectable in the channel selector, Render Channels menu and in the Export dialog. Rendering additional channels takes more memory, so if you are not interested in exporting maps for 3D packages or game engines, you can uncheck all other channels except Final. For descriptions of specific channels, see Render Channels.
All channels except Final are available in the Professional edition of Filter Forge only. See Filter Forge Editions for more information.
Channel Sets and Variants
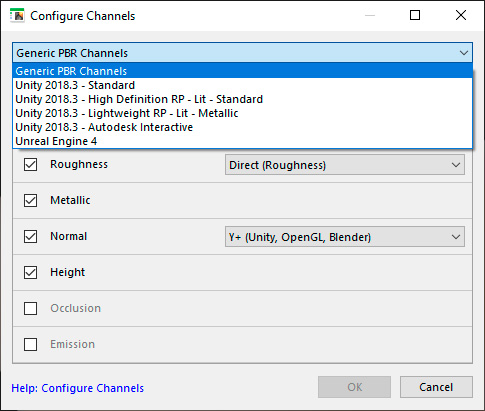
There are multiple ways to pack the same set of channels into a texture. Filter Forge offers predefined channel sets that match shaders of popular 3D engines: Unity 2018.3 – Standard, Unity 2018.3 – High Definition – RP – Lit – Standard, Unity 2018.3 – Lightweight – RP – Lit – Metallic, Unity 2018.3 – Autodesk Interactive, and Unreal Engine 4 shaders.
Beside that, each channel can have multiple channel variants. If you don't want to use a predefined channel set you can choose the Generic PBR Channels set and select a variant that matches your 3D engine requirements. For instance, the Normal channel can have a direct G (used in Unity3D) or an inverted G (used in Unreal Engine), while the Albedo channel can use either Opacity or Smoothness packed into its alpha.