Filter Forge Project a document type that contains one or more filters, specific filter settings, and reusable source images. A project is a self-contained .ffproj file – you can store all needed filters, settings, and source images for the specific project in a project, open it on another machine, and repeatedly get the same high-quality render results.
A very common use case of Filter Forge is not to apply a single filter but to create a set of images whose resolution and other parameters are known in advance – for example, a set of different-sized floor textures for a game engine, or a set of social network banners, headers, and profile pictures. Projects help you re-create a past work done in Filter Forge by having all dependencies in a single file. Projects also allow you to apply a single filter to a set of images, for instance to all images in a folder.
To create an empty project, select File > New Project from the Main Window menu.
What's Inside
A project stores the following:
- Filter files imported into the project.
- Image files imported into the project.
- Description of artboards – specific final product images, each with its source image or a blank solid-color image, and its own filter settings. Artboards within a project are independent from each other: they can have different resolutions, input images, and filters with different settings.
Projects don't store custom HDRI environments, and you can't import filters that employ custom HDRIs into a project.
Only one project can be opened in Filter Forge at a time – similar to how Filter Editor is limited to a single filter.
Quick Start
To create a new project, select File > New Project from the main menu. Next, create an artboard via the menu button: ![]()
Finally, import some filters into your project via the Browse All button.
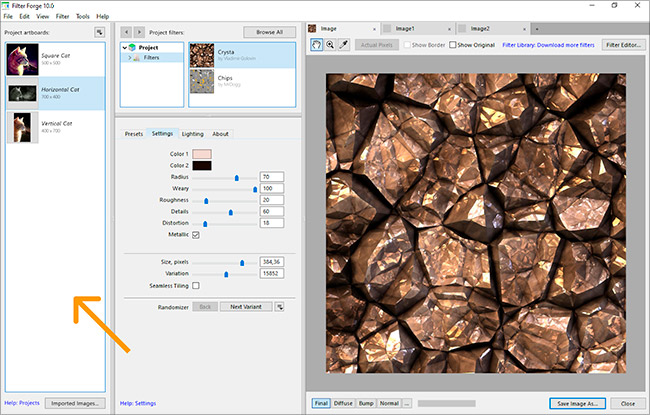
Things inside a project: Artboards
An artboard is a specific result image to be rendered within a project. Every artboard has a name, a source image file or a blank new solid-color image, and a project filter with specific settings. For instance, if you are working on a project that involves a floor texture for a video game, this project can contain as many artboards as the number of required resolutions, like "Large Floor Texture" – 512 x 512 px, "Medium Floor Texture" – 256 x 256 px, and "Small Floor Texture" – 128 x 128 px.
Source images and filters in a single project can be reused across different artboards. By editing a project filter in Filter Editor you'll affect all artboards that employ this filter.
Newly-created projects don't have a default artboard, you need to create one first.
Things inside a project: Images
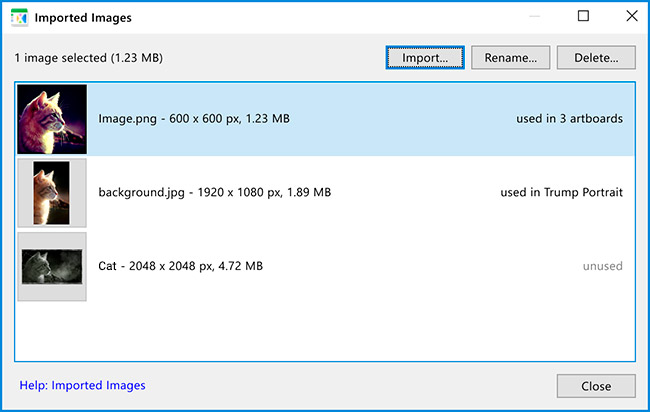
A project image is a bitmap imported into a project to be used as a source image in one or several artboards or loaded into filter controls. To load a single image from disk into your project or to create a new solid-color image, click "Imported Images" at the bottom of the Projects pane. To load an image sequence into the project, use the Artboard Properties dialog instead.
Things inside a project: Filters
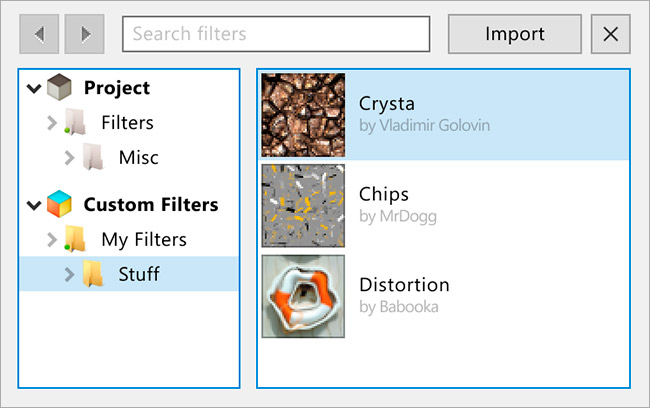
A project filter is a regular Filter Forge filter imported into a project to be used in one or several artboards. A single filter can have different settings across artboards. Import creates an editable copy of the original filter inside the project, so you can import both library and user-made filters into projects.
If a project filter uses images in color controls, all such images will be imported into the project alongside with the filter file.
Note you can have both artboard tabs and 'free', non-project tabs open in Filter Forge at a time. Switching between tabs of different types allows you to move back and forth between the regular filter manager and the project-specific filter pane quickly.
Using Animated Filters with Projects
Animated filters work best when added to Projects, since a Project allows you to apply animated effects to an image sequence rather than to a single file.
You can load a single image file or a sequence of images to be used as a source for your project artboard, and also you can load animated and non-animated filters into the project.
Combining a single source image with a non-animated filter is the classic way to use Filter Forge described elsewhere in the manual.
Combining a single source image with an animated filter enables the Timeline for animation. In this case animation duration and frame rate are defined by the Frame Count and Frame Rate components in the animated filter by default. You can override this default behavior by selecting Fixed frame count and Fixed frame rate on the Animation tab in the Artboard Properties.
Combining multiple source images with a non-animated filter allows you to apply a single effect to a set of files at a time. In the Artboard Properties dialog, select External video or sequence, and select the first file in the sequence to load the entire set of images into the artboard. Next, add a filter to the artboard, and select File > Render Animation: the filter will be sequentially applied to all images loaded into the artboard. In this case the Timeline is also displayed but it is not related to animation, it just allows you to preview the effect on any source image before rendering.
Combining multiple source images with an animated filter is another way to create animation. After loading an image sequence the Timeline for animation is displayed, and when you move the timeline head both the source image and the applied effect get changed. In this case the Timeline duration corresponds to the length of the image set. The duration will not change after loading an animated filter, since the length of the image set takes precedence over the frame count specified in the filter. You can still override the duration on the Animation tab in the Artboard Properties. Remember that the image set is processed sequentially: if the user-defined fixed duration is less than the image set length, the remaining images in the set will not be processed; if the user-defined fixed duration is greater than the image set length, the last frame of the animated filter will be applied to the remaining images.
Projects and Filter Forge Editions
Projects are only available in Filter Forge Studio Edition.